Page 1 of 2 12 LastLast
Results 1 to 50 of 52
  1. #1
    Non-member
    Join Date
    Sep 2008
    Location
    Dudley
    Posts
    59
    Post Thanks / Like

    Re: wiring sorted, Now running problems Please HELP.

    Hi,
    Does any one have a wiring guide for what wires I have to connect from my Volvo engine loom to my 5 loom. I think I read some where that I have got to use 3 or is 6 wires from the red connector block but can't remember what wire is too. Any help would be appreciated as I really need to sort the wiring tonight.
    My red connector block has about 10 wires as I have read there's 2 different ones some have about 5 some have about 10.
    Thanks Andy.
    Last edited by Andyhot; 30-05-2010 at 23:01. Reason: change title

  2. #2
    Non-member philg's Avatar
    Join Date
    Aug 2009
    Location
    Newcastle
    Posts
    2,211
    Post Thanks / Like

    Re: wiring guide

    This link give you a guide of what pins you need to connect, miller sent this to me in a pm...........

    https://www.rtoc.org/files/Technical%...o%20wiring.doc

  3. #3
    Non-member
    Join Date
    Sep 2008
    Location
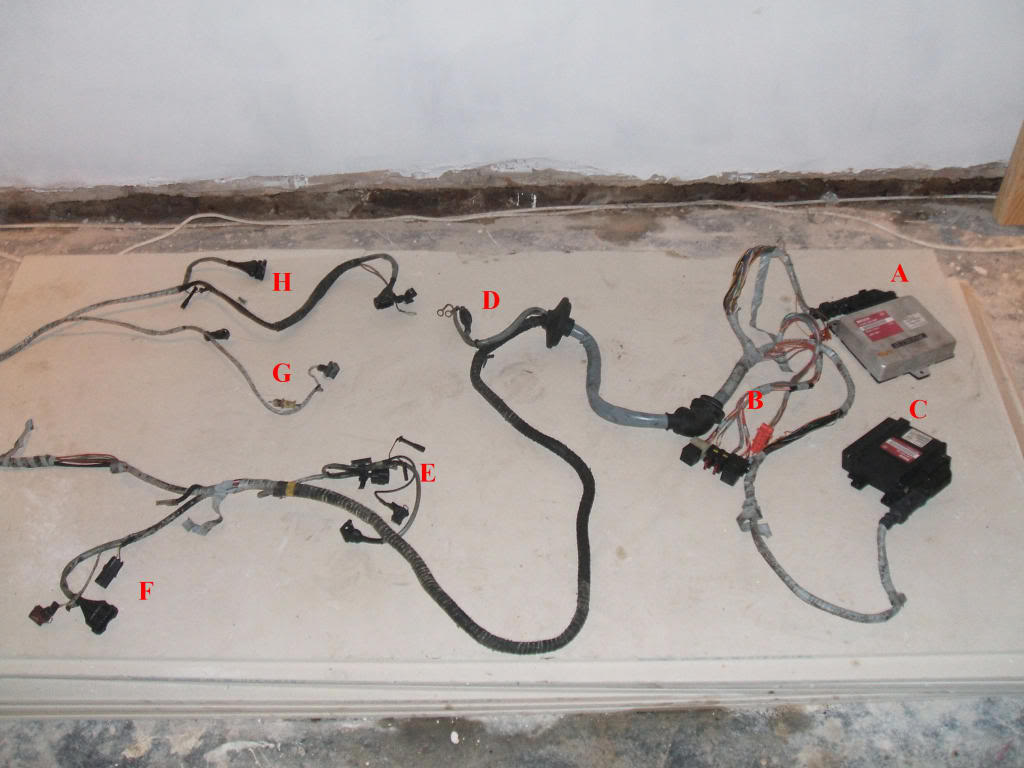
    Dudley
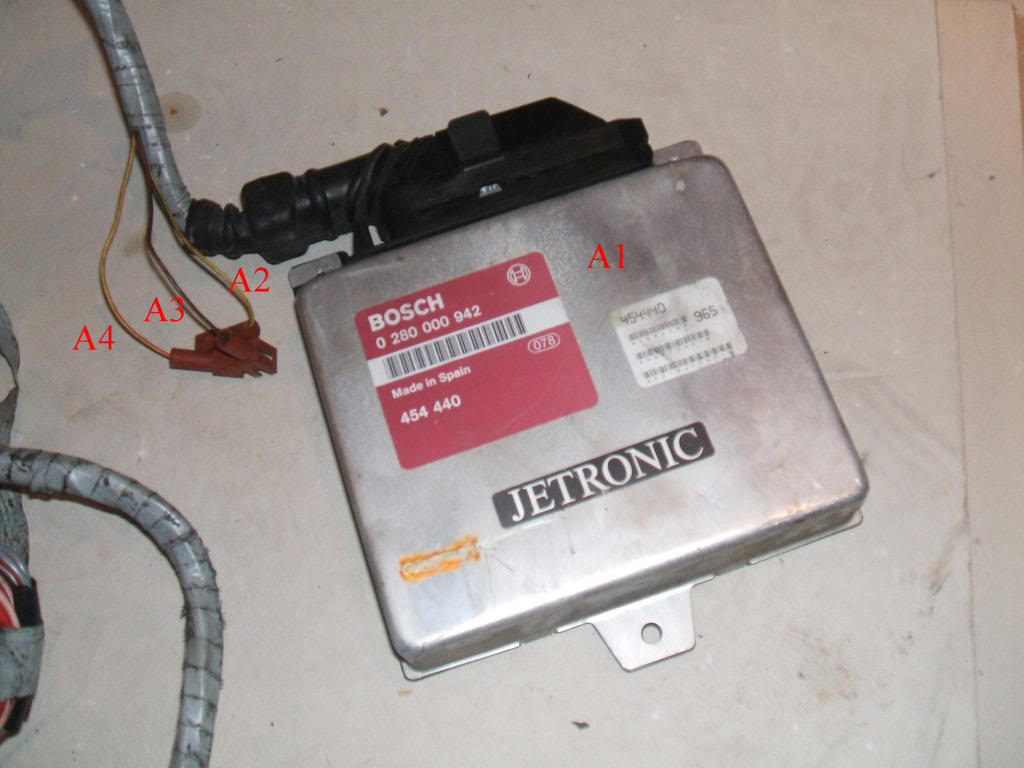
    Posts
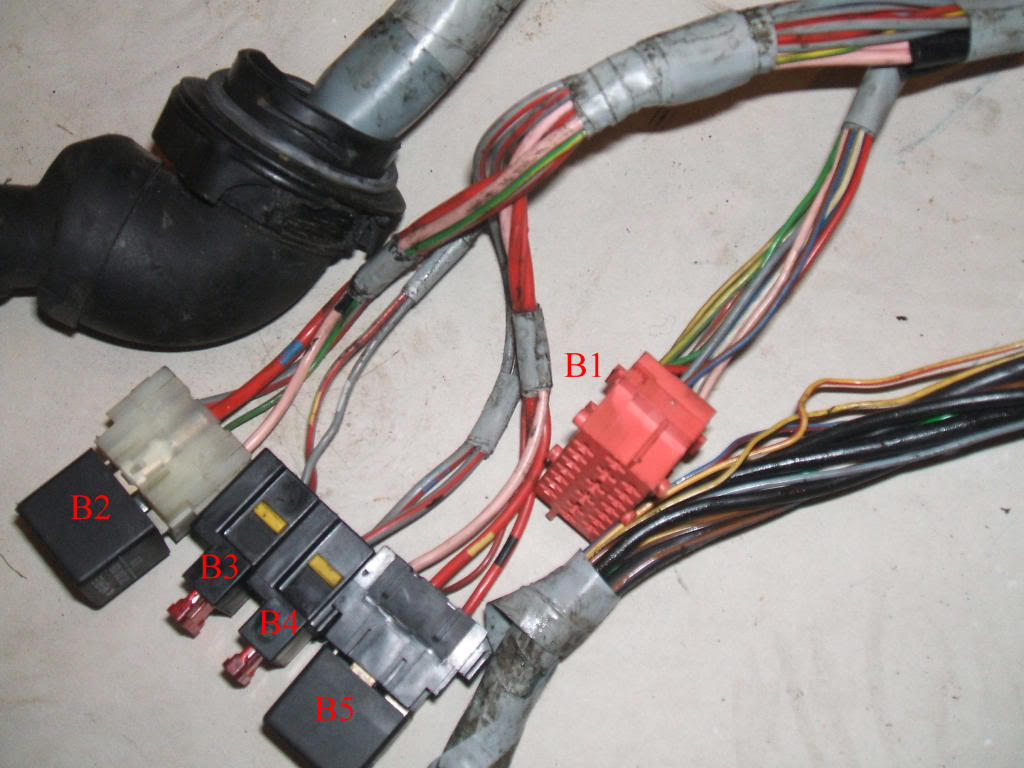
    59
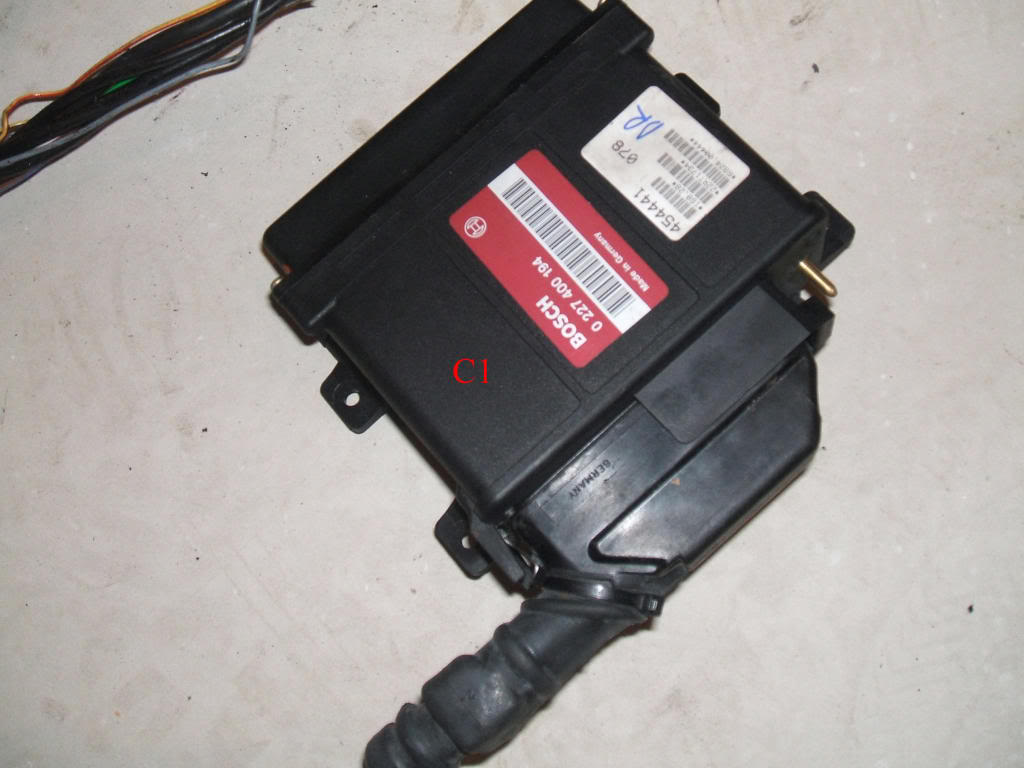
    Post Thanks / Like

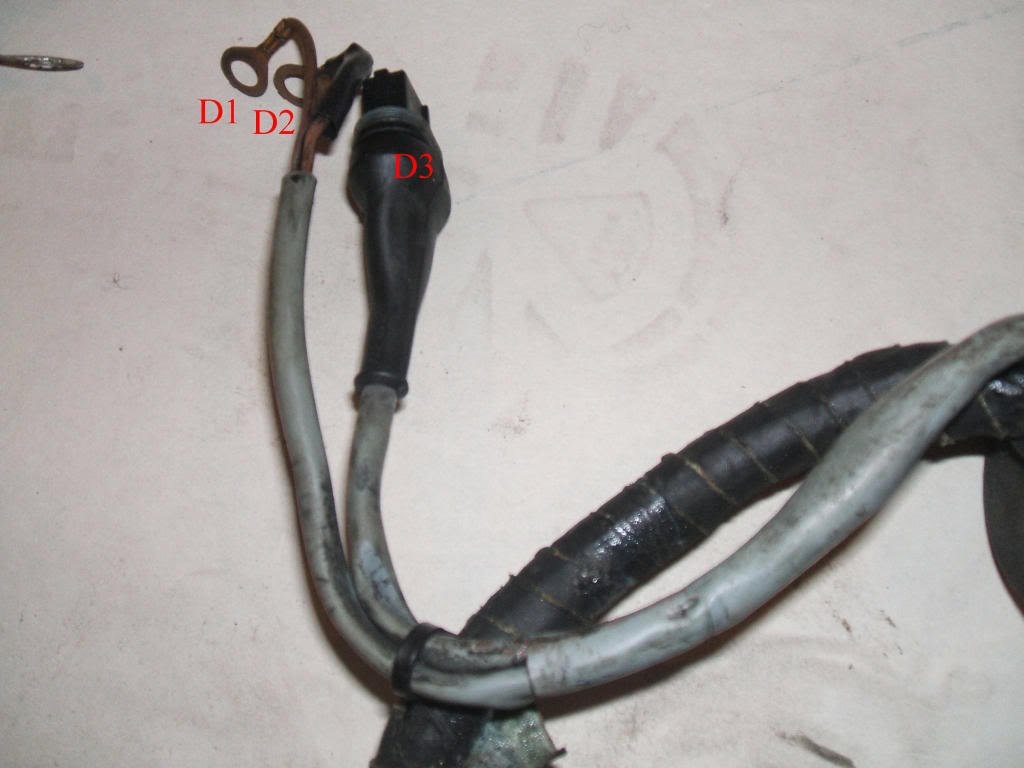
    Re: wiring guide

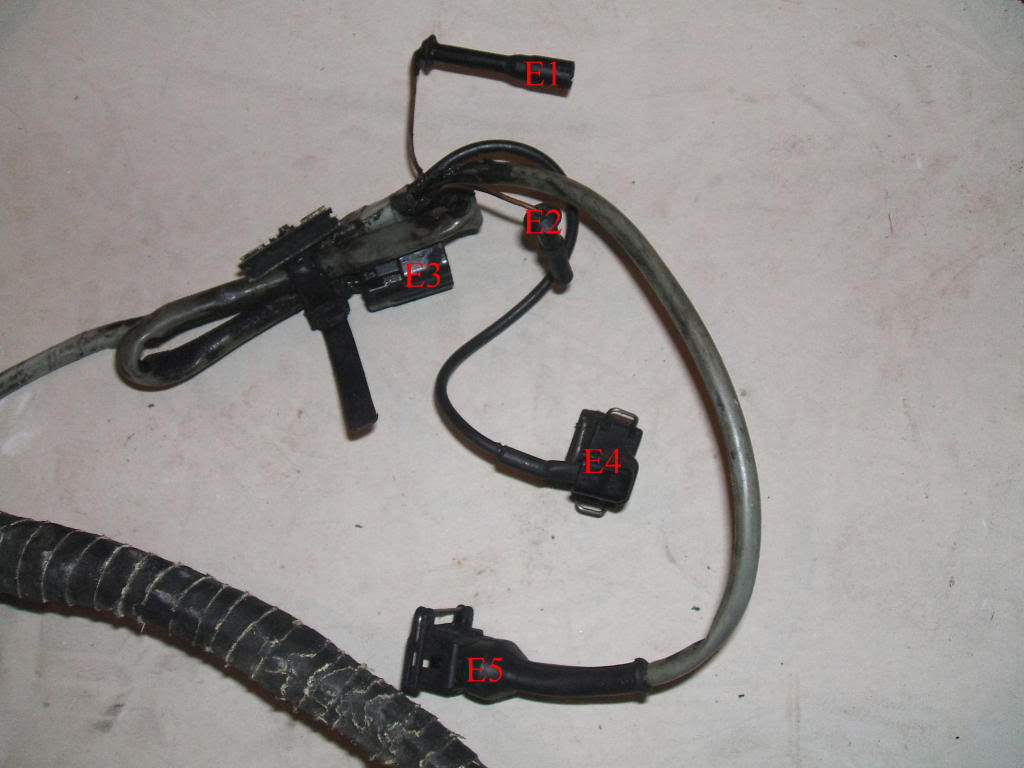
    Thanks mate,
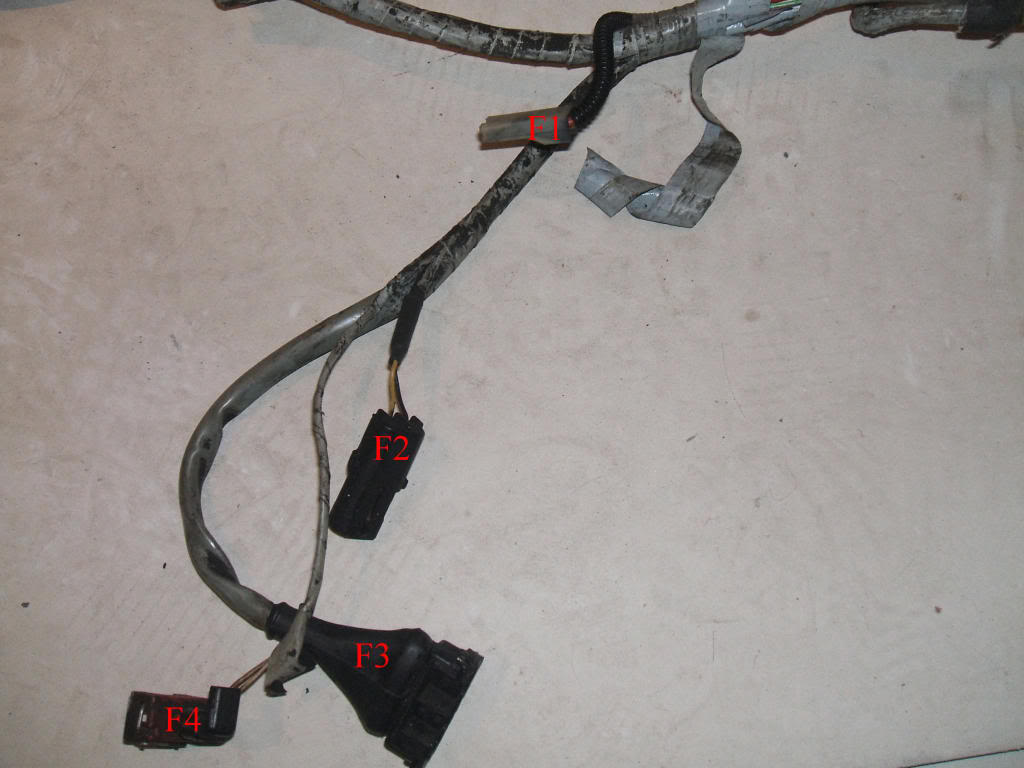
    That will be a big help.
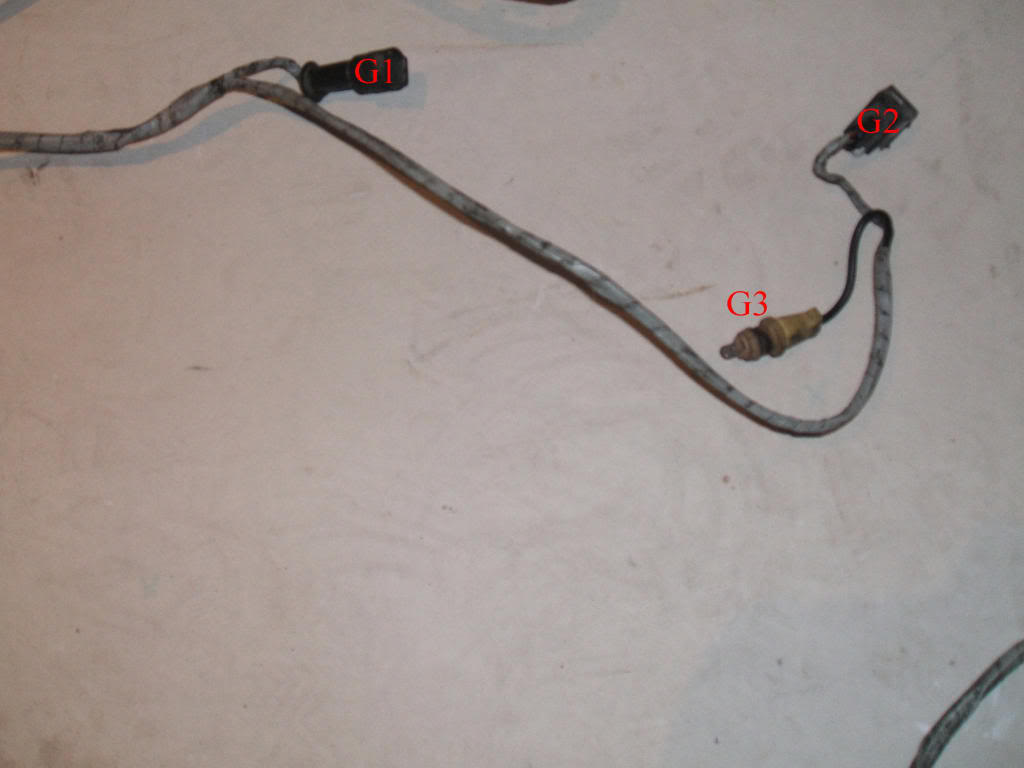
    Andy

  4. #4
    Non-member philg's Avatar
    Join Date
    Aug 2009
    Location
    Newcastle
    Posts
    2,211
    Post Thanks / Like

    Re: wiring guide

    No probs, happy to help

  5. #5
    Non-member
    Join Date
    Sep 2008
    Location
    Dudley
    Posts
    59
    Post Thanks / Like

    Re: wiring guide

    Hi,
    I have wired my car up as above with
    The blue / brown connected to the pink wire on the old aei 3 pin plug,
    the grey to the switched live at the ignition barrell,
    the thick grey / red to the white wire that goes from the renaults fuel pump relay to the pump,
    blue / white to the cranking postion on the ignition barrel.


    The car will crank but im getting no spark or fuel pump activation, the relays aren't even clicking.
    I have checked relays, tried a 12v to white fuel pump wire and it pumps.

    Should there be a main live wire that my loom is missing as i have been searching and im sure that one picture i saw had a wire that went to the battery but on my loom i cant find one. the only 2 wire on my loom with eyelet terminals are 2 brown wires 1 thick one by the injector plug and 1 thin one by the ignition coil. Are these earths or is one or both of these lives or should they be left disconnected.

    Please help as this wiring is doing my head in and ive got a feeling ive missed some thing simple such as a main live wire.

    Thanks Andy.

  6. #6
    Non-member groky's Avatar
    Join Date
    Sep 2008
    Location
    houghton-le-spring
    Posts
    174
    Post Thanks / Like

    Re: wiring guide

    i have had this same problem only mine was set up on a frame which i made, no relays clicking on or off and no spark gave up in the end would also like this help am i down an earth a live . would really like the help to get my b18ft on the go.
    cheers liam

  7. #7
    Non-member
    Join Date
    Sep 2008
    Location
    Dudley
    Posts
    59
    Post Thanks / Like

    Re: wiring guide

    Ok ive found a thick red wire with a big white spade push on connector. Ive put this to the battery and I have the relay with the black connection clicking with ignition but the ones with the red and white connections ain't doing anything.
    Please help surely someone has managed wire one up with this type of loom (fairly sure its from a 94 with the green lh2.2 and blue label ez210k)
    Andy.

  8. #8
    Non-member
    Join Date
    Sep 2008
    Location
    Dudley
    Posts
    59
    Post Thanks / Like

    Re: wiring guide

    Ok from what I can see I think that the relay for the red connector is the wrong type..
    I will try and get one tomorrow and let you know how I get on.
    Any advice would be appreciated.
    Thanks andy

  9. #9
    Non-member dave r5's Avatar
    Join Date
    Aug 2009
    Location
    pitsea essex
    Posts
    584
    Post Thanks / Like

    Re: wiring guide

    Try earthing the relay mate

  10. #10
    Trader
    Nocturnal Developments
    Haz's Avatar
    Join Date
    Sep 2008
    Posts
    776
    Post Thanks / Like

    Re: wiring guide

    the big red wire you've found is the main live to the loom, usually wired to the alt live. there's 3 earths, 2 by injector connector and one by the coil connector. with the ignition turned on one relay should click. the other when crankin. the fuel ecu should earth the second relay. you can manually earth the relay when all connected, if it clicks the either the wire to the ecu is broken or ecu is at fault, like a sensor down like tdc.

  11. #11
    Non-member
    Join Date
    Sep 2008
    Location
    Dudley
    Posts
    59
    Post Thanks / Like

    Re: wiring guide

    Hi everyone.
    Thanks for all the help.
    I have got to the point where i think its either a fried ecu or the tdc.
    I have checked the continuity on the ecu loom and all seems ok i can get the fuel pump working if i bridge the relay so the fuel pump wiring must be ok, the relays click if i earth them so the relays seem good. the switched and cranking lives are getting through to the ecu. I dont think the ecu is seeing a signal from the Tdc as from what ive read the ecu wont activate the fuel pump until it senses 3 revolutions of the engine. Also that would explain the reason im not getting anything from the coil as its not getting the signal to spark.
    tomorrow i will try the TDC off my 5 and see if that works and if thats no joy it seems im on the hunt for another green label fuel ecu.
    If anyone has any suggestions or knows to any other sensors that will stop the ecu from activating the coil and fuel pump.
    Many thanks Andy.

  12. #12
    Trader
    Nocturnal Developments
    Haz's Avatar
    Join Date
    Sep 2008
    Posts
    776
    Post Thanks / Like

    Re: wiring guide

    if the second relay doesn't click on crankin, the ecu isnt earthin it, nor firin the injectors, coil pack or fuel pump. have you checked continuety from relay to ecu pin, inc while wigglin wires, sometimes they can can be broken on the spade itself.

    also there could be a very simple fault. which yellow wires did you use for your ignition live? there's 2 sets, ign1 click and 2 click. the first has the stereo and the likes, which while cranking loses its power, which in turn be turnin your first relay off.

    generally, the ecu's dont break unless probed with lives, faulty wiring and wrong impedence injectors.
    tdc's dont seem to be as bad as gtt's, but it doesn't dangle above the turbo like a gtt !
    think the resistance of the tdc sonsor should be around 250 ohms?

  13. #13
    Non-member
    Join Date
    Sep 2008
    Location
    Dudley
    Posts
    59
    Post Thanks / Like

    Smile Re: wiring guide

    Hi everyone,
    Its alive
    Seems very rough but atleast its running.
    Haz hit the nail on the head wrong yellow at ignition was causing it to lose the live when cranking.
    I do believe ive been sold a bad engine.
    When I start engine it revs to about 3k rpm then goes to stall and hunts and misfires bad. If I catch it with the revs I can stop it stalling but it will missfire and pop and backfire until I get the revs to about 3k and it seems to clear slightly then.
    All help and advice appreciated.
    Also do I need the boost solenoid or can I remove it and just connect the actuator to the compressor housing take off with a piece of pipe.
    Thanks Andy.

  14. #14
    Non-member SCHWARTZ's Avatar
    Join Date
    May 2009
    Location
    Wallington south london
    Posts
    3,102
    Post Thanks / Like

    Re: wiring guide

    haz is the man to ask but im pretty sure you can get rid of the solenoid and do what you said or off of the plenum somewhere. What are the gaskets like manifolds and head?

  15. #15
    Non-member J8TRO's Avatar
    Join Date
    Sep 2008
    Location
    Stourbridge
    Posts
    1,027
    Post Thanks / Like

    Re: wiring guide

    Good work Andy, Dan told me earlier on the phone. I'm sure you'll sort out the little niggles and it will be sweet.

    Let me know when you need that bumper, it's not a problem sat in the shed, so don't worry about it.

  16. #16
    Trader
    Nocturnal Developments
    Haz's Avatar
    Join Date
    Sep 2008
    Posts
    776
    Post Thanks / Like

    Re: wiring guide

    sounds like it could be a mismatch on the ecu's, or more than likely a faulty afm or its wiring. let the car idle with it plugged and unplugged, if it runs the same when plugged in cover up half of it, if it kinda runs the same then the afm is dud, they just go anytime really. i have had faults with the connector to it, behind the rubber boot tho so worth a check, and also see if there's a screw visible on the side, or whether its bunged up and original, oh, assuming your runnin std setup

  17. #17
    Non-member
    Join Date
    Sep 2008
    Location
    Dudley
    Posts
    59
    Post Thanks / Like

    Re: wiring guide

    Hi everyone,
    My fuel ecu is
    Green label
    0 280 000 959
    464492 (965)
    On white label
    464492
    462 23 (965)
    28rt0000
    5013 00018

    Ignition ecu is
    Blue label
    0 227 400 216
    464493 (965)
    On white label
    265 18
    22rt0000
    5325 00089

    Is there a way to check these are a match?

    I have started the car with the maf disconnected and it just stayed reving at about 3k and didn't try to stall and the screw is visible.
    Also checked resistance on the temperature sensor by plug 1 and on 1 pin it was 5.59 kohm and other 6.11 kohm.
    Any suggestions or advice.
    I have brought new dizzy, rotor and plugs to try and see if it cures the misfire.
    I have the engine setup as standard ie. Maf, tps, temp sensor, idle valve, knock sensor, crank sensor, injectors and coil all connected,I left the boost solenoid off and just put a piece of pipe from compressor housing to actuator.
    Also the fuel feed goes to drivers side of fuel rail and return from standard fpr on passenger side of rail.
    Thanks Andy.
    Last edited by Andyhot; 28-05-2010 at 10:10. Reason: additional information

  18. #18
    Non-member
    Join Date
    Sep 2008
    Location
    Dudley
    Posts
    59
    Post Thanks / Like

    Unhappy Re: wiring guide

    Hi everyone,
    Ive changed the dizzy, rotor and spark plugs and its still the same.
    Does any one have a clue about wether the above ecus match as i dont want to be replacing everything chasing a fault if its them.
    Also i dont have a lambda sensor is this needed as ive noticed the mixture smells rich.
    I now its a long shot but is anyone close to Dudley with a volvo engine in their 5 or even a volvo 440/60/80 turbo thats running properly as i would be prepared to pay for expenses and your troubles as i think a couple of hours with a know well car to try a couple of sensors would find the problem in no time.
    Please help any advice or info is much welcomed as its doing my head in.
    i have checked continuity on pretty much every wire in the loom and all seems well there.
    thanks Andy

  19. #19
    Non-member
    Join Date
    Sep 2008
    Location
    Dudley
    Posts
    59
    Post Thanks / Like

    Re: wiring sorted, Now running problems Please HELP.

    Ok just found out on volvo forum that the above ecus do go together so that seems to rule that out unless one of them is no good but as it actually runs and haz says that its rare they go wrong i will try to find the fault else where.
    Is there any way to check the Maf, Coolant, Tps sensors so i can eliminate them.
    Im going to order some ht leads as thats the only ignition component i havent replaced as i had the coil off Dave and it was known to be good.
    Whats the best way to confirm the timing correct (strobe light?)as i have replaced the belt but just fitted it exactly the same as the one that was on there so if that was a tooth out it would still be out and i never saw the engine run.
    Also could anyone confirm that on the fuelling you feed to rail and return from the regulator.
    Thanks andy.

  20. #20
    Trader
    Nocturnal Developments
    Haz's Avatar
    Join Date
    Sep 2008
    Posts
    776
    Post Thanks / Like

    Re: wiring guide

    generally these engine run fine on the std dizzy, plugs, rotor, leads etc etc. they can have electrical issues but mainly due to things that's been changed. the sensors dont really play up, barr the afm.
    your fuelling is set correct, assuming you've not fitted a gtt reg inline too.
    lambda just makes slight adjustments either way one the initial settings have been done.

    ya afm should have the code endings in 021 i think.
    wats the resistance between the outside pins on the maf (200 ohms)? pin 1 and 6.
    then again on the next in, 2 and 5, hmm i forget now but get the readings for them plus pin 2 and 6, and 1 and 5.
    the check the readings again after tha car has run.
    from memory, there's 2 hotwires in the afm 1 and 6 is the external wire that can be seen thru the afm, the other in the box. the way it works is seein the heat difference between the two and works out how much fuel to put in.
    dismiss cambelt for now as it runs.
    my guesses are
    dud afm but as you say it changes when its unplugged so shouldn't be that but worth a try.
    could also be an air leak with it revving up unplugged, all pipes from afm outlet to manifold need to be tight and leak free.

  21. #21
    Non-member
    Join Date
    Sep 2008
    Location
    Dudley
    Posts
    59
    Post Thanks / Like

    Re: wiring guide

    My afm is 0280 212021
    Resistance across pins with afm off car is
    1-6 663
    2-5 20.8k
    1-5 20.8k
    2-6 663
    1-2 0.1
    5-6 21.5k
    3-4 23.1k

    Will get same readings after running engine later as I have removed top half of inlet to check condition of the gasket. Also removed and checked injectors are spraying which seem fine and o rings look good.
    I will also remeasure the temp sensor resistance when the engine is hot.
    Thanks Andy.

    Ok ive reassembled the engine and had it running for 5 mins to get up to temprature.
    (about 3/4 on the gt gauge)
    after running the resistance across the pins is
    1-6 662
    2-5 21.23k
    1-5 21.23k
    2-6 662
    1-2 0.1
    5-6 21.9k
    3-4 23.1k

    Also the resistance for the 2 pins on the temprature sensor with the engine hot is
    1= 743ohms
    2= 798ohms

    Hope this info helps you help me.

    Many thanks Andy.
    Last edited by Andyhot; 02-06-2010 at 22:30. Reason: additional info

  22. #22
    Trader
    Nocturnal Developments
    Haz's Avatar
    Join Date
    Sep 2008
    Posts
    776
    Post Thanks / Like

    Re: wiring guide

    ok, its a later afm so correct with ecu's.
    looking at your figures its pins 1 and 2 for each hotwire with the earth on 6. although one should alter after its been ran, even if just for 10 seconds.
    663 is rich too but will run ok usually, normally i'd set them to 650 for and engine runnin 15psi, worth turning it down, anticlockwise via the screw, try about 400 for now.
    i think you mentioned puttin your hand half and fully over the airflow, making it leaner then cut out, but yours still runs? air leak then.
    i'd boost test the engine next, you'll need a compressor or at least a foot pump. have everything connected, remove air filter and bung up with and aerosol can or summit and jubilee on. remove a vac pipe bung from the manifold and attach airline, pressurise the system aiming for 15psi on your gauge. if it makes no boost it has a massive air leak, makes loads but drops off quick then still a big leak, either ways you'll hear it. ideally you want it to hold what you put in. always check a few psi more than you plan to run, helps to pop off any 'not quite tight enough' boost pipes etc.

  23. #23
    Non-member
    Join Date
    Sep 2008
    Location
    Dudley
    Posts
    59
    Post Thanks / Like

    Re: wiring guide

    Hi,
    Ive tried pressure testing the engine with a small electric tyre pump and i couldnt even get 1psi of pressure so i presume i have a massive leak. Im 99% sure i could hear it leaking from down the back of the engine but couldnt get to it to try it with washing up liquid to find the exact placebut my first suspect is the inlet manifold (to head) gasket.
    Has anyone ever removed their inlet manifold with the engine in the 5 as i cant even see the bolts, so i dont think i can get to them to undo them.
    Should i just remove the head so i can check the head gasket and internal condition and replace the inlet,exhaust,throttle body gaskets and what other gaskets there are.
    If i remove the head would it be worth having it skimmed and pressure tested?
    Also where is the best place to get gaskets? Volvo Dealers?
    Thanks for all the help everyone.
    Oh and also who asked at the start of this thread what condition my gaskets are in, It looks like i was wrong and they're not very good.
    Thanks Andy

  24. #24
    Non-member SCHWARTZ's Avatar
    Join Date
    May 2009
    Location
    Wallington south london
    Posts
    3,102
    Post Thanks / Like

    Re: wiring guide

    Quote Originally Posted by SCHWARTZ View Post
    haz is the man to ask but im pretty sure you can get rid of the solenoid and do what you said or off of the plenum somewhere. What are the gaskets like manifolds and head?

    i got mine from euro car parts but think you can get them cheaper from gsf. I got a kit came with pretty much everything minus sump and water pump. checked both sites but cant seem to find them for the b18ft at the moment.

  25. #25
    Non-member
    Join Date
    Sep 2008
    Location
    Dudley
    Posts
    59
    Post Thanks / Like

    Re: wiring guide

    Hi mate,
    Is this the kit you got.
    http://www.partsforvolvosonline.com/...oducts_id=4356
    Is this a resonable price for it.
    Thanks Andy

  26. #26
    Trader
    Nocturnal Developments
    Haz's Avatar
    Join Date
    Sep 2008
    Posts
    776
    Post Thanks / Like

    Re: wiring guide

    its more than likely the manifold gasket, poss the rubber ring has split or moved.
    you could use a smoke bomb like used to check chimney's are clear, not tried like but an idea.
    it can be removed in the car but can be a pain, hence me removin the bulkhead lol. once ya have the upper half off, remove the metal injector sheild n you'll be able to see then nuts. worth takin the turbo off too.
    inlet and exhaust are in one, manifold halves one is part of the sheild, throttle is fine with sealant. thats it.
    dont skin the head, its flat and not the fault. same for pressure testin. unless for your own peice of mind.
    volvo aint cheap, gsf do a headset, from memory have volvo stamped all over the box.

  27. #27
    Non-member
    Join Date
    Sep 2008
    Location
    Dudley
    Posts
    59
    Post Thanks / Like

    Re: wiring guide

    Hi Haz,
    Sorry but aint sure what you mean by rubber ring?
    Will Give gsf a ring in the morning and try and get a headset.
    Do You think It would be worth while doing the head gasket while i have the manifolds removed as from what i can see id be halfway to having the head off.
    Is there any sort of guide for doing the headgasket ?
    I would probably be able to do it without but it just gives piece of mind following a guide to know for certain that things have been done in the right order and right tightness etc.
    Thanks For all your help
    Andy

  28. #28
    Trader
    Nocturnal Developments
    Haz's Avatar
    Join Date
    Sep 2008
    Posts
    776
    Post Thanks / Like

    Re: wiring guide

    ah sorry, i've seen a few types of manifold gaskets. a wafer thin metal one, a laminated card, a perforated tin foil and the one i'm on about which is 3 ply metal squash type which has rubber rings around the inlet ports.
    head on or off you'll be changin the gaskets, why make work drainin coolant removing cambelt, water hoses, fuel lines, unplugging sensors to build bac up, oil change then be at the same place. although with the 5 engine bac it is easier to work on it all off the car, guess its as long as short in the end, plus you can double check things as you go. volvo manual for your torque settings etc.
    personally i'd wip the turbo and downpipe off for access, 4" extension bar on a ratchet reaches most of them, its just the one under the turbo that needs a spanner, from memory as my manifold isn't std anymore and is a pig to get off

  29. #29
    Non-member
    Join Date
    Sep 2008
    Location
    Dudley
    Posts
    59
    Post Thanks / Like

    Re: wiring guide

    Called gsf this morning and they no longer do the gaskets, so ill order one from the site above.
    I will do a cylinder compression check later and if all's okay ill leave the head as like you say it just causes loads more work. Will let you know how I get on.
    Thanks for all your help.
    Andy.

  30. #30
    Non-member
    Join Date
    Sep 2008
    Location
    Dudley
    Posts
    59
    Post Thanks / Like

    Re: wiring guide

    THANK YOU EVERYONE.
    Its fixed.
    changed inlet manifold gasket and its running great.
    Still yet to drive it because it seems to get hot very quick according to my guage.
    Where about on the 5s gauge should the thermostat be opening and when should the fan kick in?
    I have a new thermostat fitted but my temp gauge gets to near the very top and it doesn't seem like its opening as all the other pipes get hot except for the thermostat to Rad hose.
    Also it doesn't seem like my altenator is charging but I haven't got a wire on the top connection. On the 5 alternator plug there's 2 wires but only one pin on this alternator. Should I connect the yellow, purple or both to the pin and would that affect the charging.
    Thanks again.
    Andy.

  31. #31
    Non-member SCHWARTZ's Avatar
    Join Date
    May 2009
    Location
    Wallington south london
    Posts
    3,102
    Post Thanks / Like

    Re: wiring guide

    glad to hear it geez.
    check the system for air locks ect also how have you plumbed it up? bottom rad hose should go straight to the water pump, from the stat back to the rad and the take offs go to the likes of the heater matrix and expansion bottle.

  32. #32
    Non-member
    Join Date
    Sep 2008
    Location
    Dudley
    Posts
    59
    Post Thanks / Like

    Re: wiring guide

    Hi,
    Ive got top Rad to thermostat, bottom Rad to water pump, rear head take off to top matrix, bottom matrix to expansion tank, little take off on rear head to top of expansion tank, metal pipe that runs around block to expansion tank.
    I think either the thermostat isn't opening even though its new or my bottom rad hose is causing a restriction as it is the gt one and has some tight turns.
    I will remove the stat tomorrow and test it in boiling water to rule it out.
    Thanks Andy.

  33. #33
    Trader
    Nocturnal Developments
    Haz's Avatar
    Join Date
    Sep 2008
    Posts
    776
    Post Thanks / Like

    Re: wiring guide

    glad to hear it
    have you used the cars original water temp sensor to replace the one by the thermostat? usually the volvo one will read high high on a renault gauge, with the fan only kicking in as it goes into the slats.
    just pop the thermostat into a boilin mug of water, if it open it works, if you want to test properly then use a thermometer too and see wat temps it closes at. i'd say a 3rd of the water in the system bypasses the thermostat anyway so can take a while to warm up.
    you need a connection on the top of the alt for it to turn on. on the 2 pin, yellow is for ign live and purple for the dash light. on the single pin i think its just the purple.
    i'd swap your heater matrix hoses over 2, i find using the top as the outlet helps bleed that part of the system. the rest sounds fine tho.

  34. #34
    Non-member TrixNFlix's Avatar
    Join Date
    Oct 2008
    Location
    Preston
    Posts
    2,028
    Post Thanks / Like

    Re: wiring guide

    Right guys this could help all of us, just wondering what sensors are for what etc with pictures, This is from a volvo 480, loom label says its from late 91 and is totaly standard. Tried to list what i think i right, please add to this and i can update these pics. Hope they help
    Last edited by TrixNFlix; 06-06-2010 at 22:20.

  35. #35
    Non-member TrixNFlix's Avatar
    Join Date
    Oct 2008
    Location
    Preston
    Posts
    2,028
    Post Thanks / Like

    Re: wiring guide

    These pics are from the loom showed moving from right to left.


    A1 Jetronic Module
    A2 Test Point
    A3 Test Point
    A4 Test Point
    Last edited by TrixNFlix; 07-06-2010 at 19:52.

  36. #36
    Non-member TrixNFlix's Avatar
    Join Date
    Oct 2008
    Location
    Preston
    Posts
    2,028
    Post Thanks / Like

    Re: wiring guide


    B1 Connect To R5 Loom From Here
    B2 Fuel Pump relay
    B3 Module fuse
    B4 Fuel Pump Fuse
    B5 Modules relay
    Last edited by TrixNFlix; 06-06-2010 at 23:48.

  37. #37
    Non-member TrixNFlix's Avatar
    Join Date
    Oct 2008
    Location
    Preston
    Posts
    2,028
    Post Thanks / Like

    Re: wiring guide


    C1 Ignition Module
    Last edited by TrixNFlix; 06-06-2010 at 22:11.

  38. #38
    Non-member TrixNFlix's Avatar
    Join Date
    Oct 2008
    Location
    Preston
    Posts
    2,028
    Post Thanks / Like

    Re: wiring guide


    D1 Earth near to injectors
    D2 Earth near to injectors
    D3 For Injectors
    Last edited by TrixNFlix; 06-06-2010 at 22:14.

  39. #39
    Non-member TrixNFlix's Avatar
    Join Date
    Oct 2008
    Location
    Preston
    Posts
    2,028
    Post Thanks / Like

    Re: wiring guide


    E1 Test Point
    E2 Test Point
    E3 Volvo Sensor In Sump For Volvo Gauges
    E4 Knock Sensor
    E5 To Idle Control Valve
    Last edited by TrixNFlix; 07-06-2010 at 19:55.

  40. #40
    Non-member TrixNFlix's Avatar
    Join Date
    Oct 2008
    Location
    Preston
    Posts
    2,028
    Post Thanks / Like

    Re: wiring guide


    F1 To Alt Live
    F2 To Tdc Sensor
    F3 Throttle Position Sensor
    F4 Ecu Temp Sensor On Front Of Block
    Last edited by TrixNFlix; 07-06-2010 at 19:56.

  41. #41
    Non-member TrixNFlix's Avatar
    Join Date
    Oct 2008
    Location
    Preston
    Posts
    2,028
    Post Thanks / Like

    Re: wiring guide


    G1 Air Temp Sensor In Turbo Inlet Pipe For Volvo Gauges
    G2 Lambda Probe
    G3 Test Point
    Last edited by TrixNFlix; 07-06-2010 at 19:59.

  42. #42
    Non-member TrixNFlix's Avatar
    Join Date
    Oct 2008
    Location
    Preston
    Posts
    2,028
    Post Thanks / Like

    Re: wiring guide


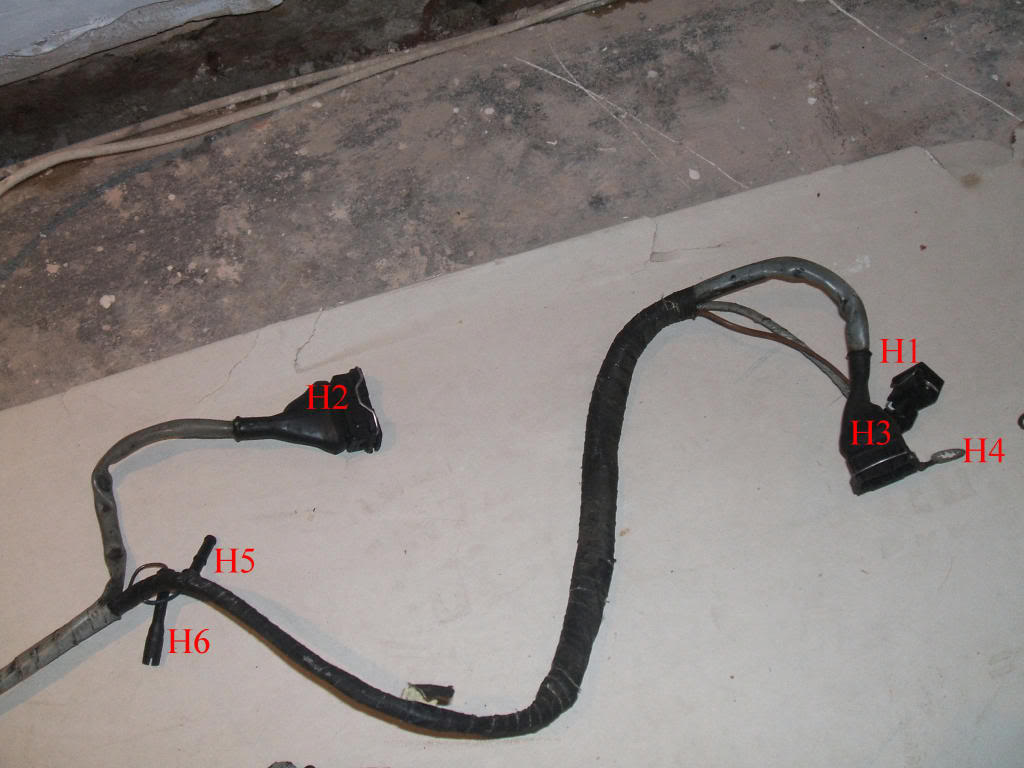
    H1 Volvo Boost Solenoid
    H2 To AFM
    H3 To Coil
    H4 Earth To Dizzy Cap
    H5 Test Point
    H6 Test Point
    Last edited by TrixNFlix; 07-06-2010 at 20:03.

  43. #43
    Non-member
    Join Date
    Sep 2008
    Location
    Dudley
    Posts
    59
    Post Thanks / Like

    Re: wiring guide

    Hi
    That gives me a bit of peace of mind. I got scared and turned the car off before it got into the slats.
    will swap hoses on matrix tomorrow, test thermostat with boiling water, swap temperature sensor over and connect the yellow wire to alternator. Might try and get one of them pipe springs that stops pipes from closing on bends for the bottom Rad hose.
    Will let you know how I get on.
    Thanks Andy.

  44. #44
    Non-member Nick k's Avatar
    Join Date
    Sep 2008
    Location
    Leicester
    Posts
    901
    Post Thanks / Like

    Re: wiring guide

    Quote Originally Posted by Haz View Post
    glad to hear it
    have you used the cars original water temp sensor to replace the one by the thermostat? usually the volvo one will read high high on a renault gauge, with the fan only kicking in as it goes into the slats.
    .
    AArrrrhhhh Nice one Haz!!! I was wondering why the temp gauge was going for melt down on mine and the rad fan was just sitting there doing nothing with a brand new box fresh fan switch in it. I'll get the renault temp sensor fitted. Does that temp sensor only do the dash gauge and not the ecu??

  45. #45
    Non-member
    Join Date
    Sep 2008
    Location
    Dudley
    Posts
    59
    Post Thanks / Like

    Re: wiring guide

    hi,
    the 2 pin temp sensor on the front is for the ecus, the single pin on side is for the gauge.
    andy

  46. #46
    Trader
    Nocturnal Developments
    Haz's Avatar
    Join Date
    Sep 2008
    Posts
    776
    Post Thanks / Like

    Re: wiring guide

    unlabelled connectors

    a2,3,4 test points
    e1,2 test points
    e3 volvo sensor in sump for volvo gauges
    e4 knock sensor
    f4 ecu temp sensor on front of block
    g1 air temp sensor in turbo inlet pipe for volvo gauges
    g2 lambda probe
    g3 test point
    h1 volvo boost solinoid
    h5,6 test points

    your better off keeping all the original sensors of the cars original engine and fit with unions etc so that all the gauges calibrate correctly, even sensors from other cars of the same model can read slightly out.

  47. #47
    Non-member TrixNFlix's Avatar
    Join Date
    Oct 2008
    Location
    Preston
    Posts
    2,028
    Post Thanks / Like

    Re: wiring guide

    Quote Originally Posted by Haz View Post
    unlabelled connectors

    a2,3,4 test points
    e1,2 test points
    e3 volvo sensor in sump for volvo gauges
    e4 knock sensor
    f4 ecu temp sensor on front of block
    g1 air temp sensor in turbo inlet pipe for volvo gauges
    g2 lambda probe
    g3 test point
    h1 volvo boost solinoid
    h5,6 test points

    your better off keeping all the original sensors of the cars original engine and fit with unions etc so that all the gauges calibrate correctly, even sensors from other cars of the same model can read slightly out.
    Thanks for that Haz . Pics updated

  48. #48
    Non-member TrixNFlix's Avatar
    Join Date
    Oct 2008
    Location
    Preston
    Posts
    2,028
    Post Thanks / Like

    Re: wiring guide

    Quote Originally Posted by Tarmac trasher - Nick View Post
    Does that temp sensor only do the dash gauge and not the ecu??
    yeah nick that one located next to the thermostat on the side of the head is not used by the ecu. The Ecu water temp sensor (f4 on pics) is located at the front of the block near to the throttle position sensor.

  49. #49
    Non-member SCHWARTZ's Avatar
    Join Date
    May 2009
    Location
    Wallington south london
    Posts
    3,102
    Post Thanks / Like

    Re: wiring guide

    cheers for the pix of the wiring loon was a great help is anyone using a 740 coil? or knows what to do with the connector? i assume cut the connector off and take the wires straight to the coil but which ones and where?

  50. #50
    Non-member SCHWARTZ's Avatar
    Join Date
    May 2009
    Location
    Wallington south london
    Posts
    3,102
    Post Thanks / Like

    Re: wiring guide

    Again i have got my self stuck what is the best way to wire it all up? I was going to use the renault connector and wire the volvo loom to that. But what i dont get is what wires go where and if theres any wires on the renault loom that i need to keep like the reverse lights and alternator and starter motor leads? also there seems to be no power lead for the volvo loom like on the renault so should that be kept? any help would be great or if anyone could tell me what wires do what on the renault connector? cheers guys..

Posting Permissions

  • You may not post new threads
  • You may not post replies
  • You may not post attachments
  • You may not edit your posts
  •