


Fuel tank removal and repair.
contributed by Andrew Isaac
Changing your petrol tank / Fixing once off / Changing Fuel Sender Unit. A slightly (!) more in-depth guide to changing your petrol tank etc than Haynes goes into.
Tools Needed / Recommended:
10mm spanner / socket
11mm spanner / socket
13mm spanner / socket
set of torx bits for handbrake cable clips
trolley jack + block of wood
two axle stands
torch or clip lamp
bucket (for fuel spillage.)
Tools for fixing the tank:
Soldering iron with a small pointed tip about 1-2mm.
Tube of araldite I went for the red one which sets in 4 minutes.
Tools for removing the petrol gauge sender unit:
Screwdriver
Hammer
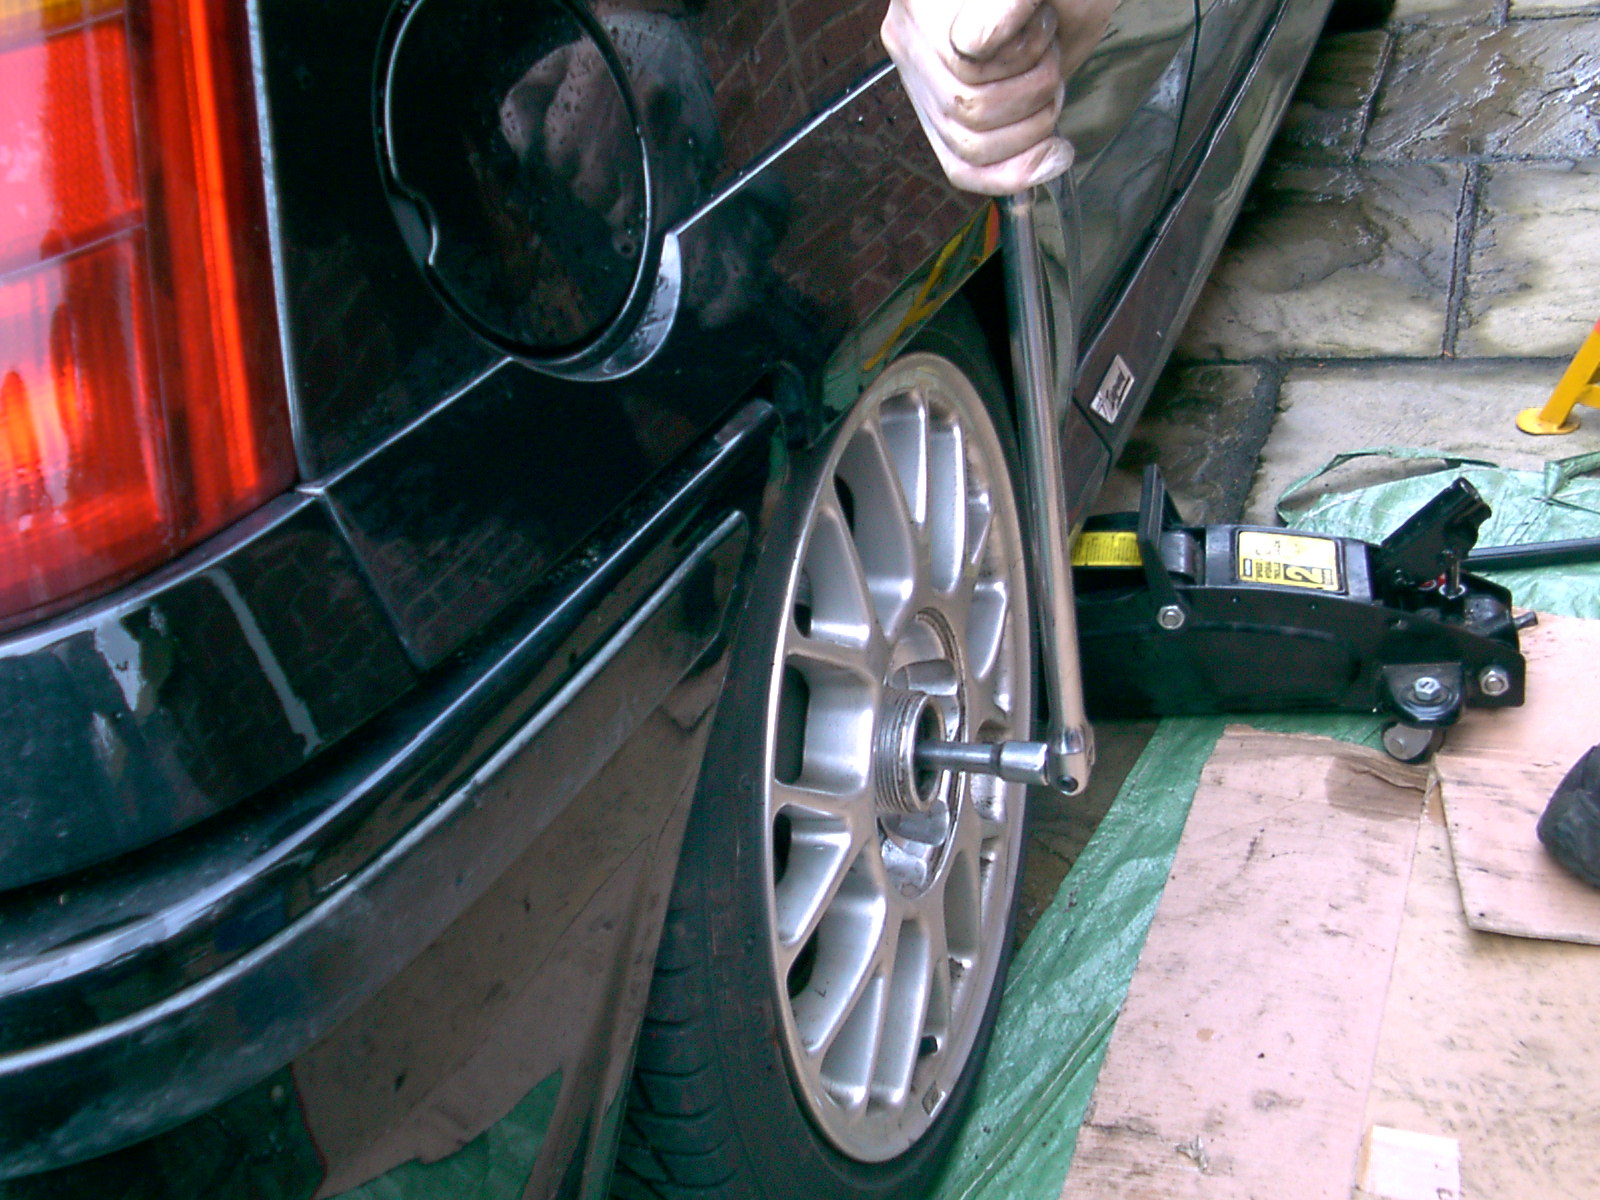
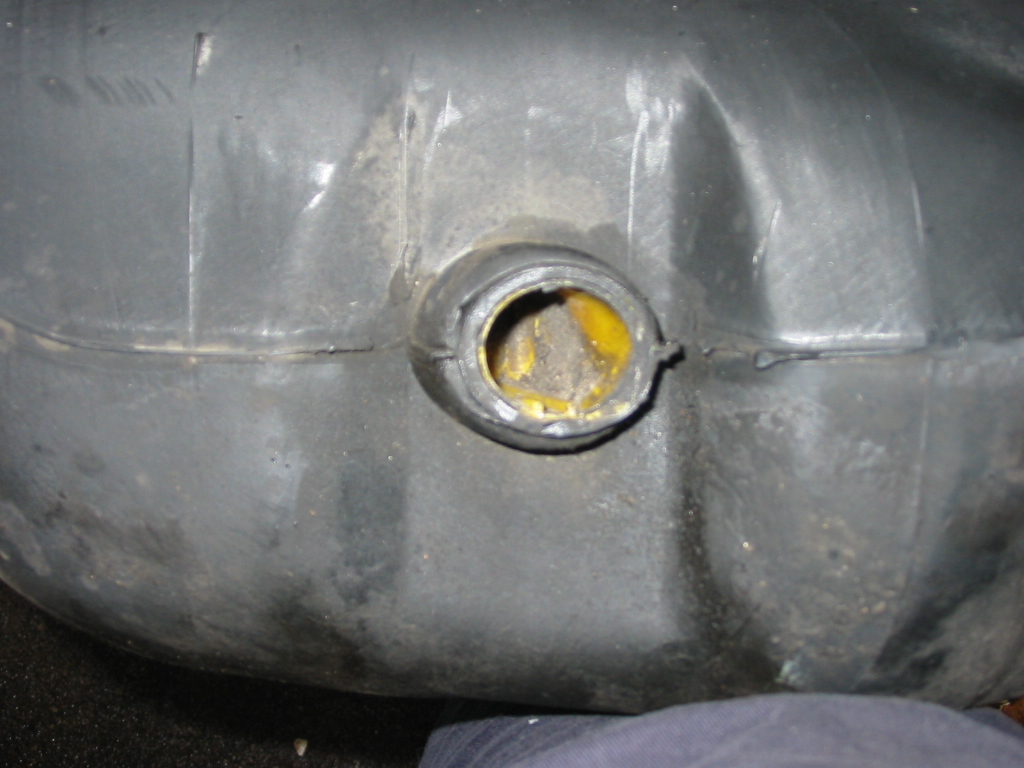
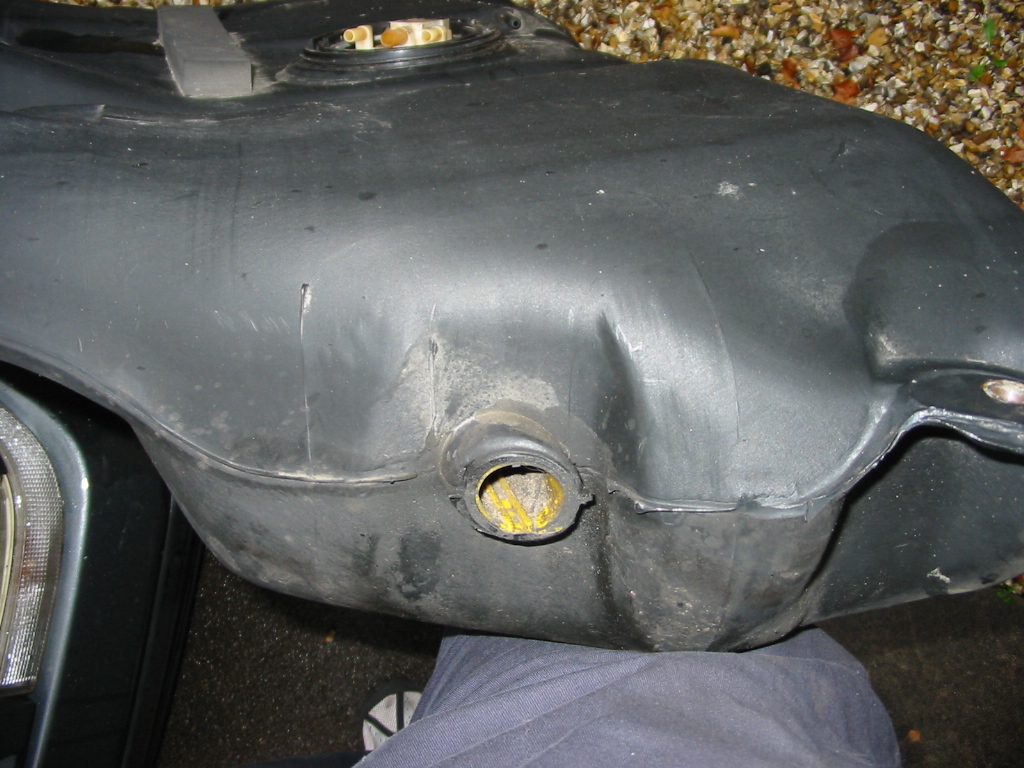
Is your car smelling of petrol? Has your fuel consumption got out of control? Either you need a lighter pair of boots or your petrol tank is leaking. If you have a look under the car at the drivers side rear wheel you can see the petrol tank and what would appear to be the tank seeping petrol from a yellow bung.
Before I started, I thought this job was going to be a lot harder than it actually was. As you are working under the car I would suggest that you jack your car up as far as you feel safe. There will not be a lot of room for you especially when it comes to getting the tank back on the car. I managed to get mine up about a foot (second hole on the axle stands) at the rear beam, which gave a decent amount of room to work.
To make things simpler, try and use as much fuel as you can before you attempt this job. I found that even with what looks like a small amount showing on the dash petrol gauge, there is a surprising amount of fuel still in the car.
Once you have the car airborne, first slacken off the handbrake mechanism under the middle of the car. On the yoke there is a 13mm lock nut and I think a 11mm nut that you can get a spanner on to loosen the handbrake cables (in the brake section of Haynes). Once you have eased it off a way you should be able to release the cables so they can be moved out of the way of the tank. There should be two clips that hold the cables onto the rear suspension beam that are held by torx screws. Take these off, then you can move the cables out of the way I turned the cables under the rear wheels.
If you have an after market exhaust I would suggest removing the exhaust from the centre section back. I appreciate this does seem a lot of work but it creates a lot of room to get the tank off and then back onto the car. The problem area is where the exhaust goes over the rear suspension. I found the exhaust fouled the heat shield on the tank when I had the tank in place and wouldnt let me remove the tank from the car. I had to take the exhaust off, take the tank off and then afterwards refit it so it cleared it. This maybe a problem with scorpion exhausts because of their shape of the particular bend. But I dont think it would be too much problem for side exit owners!
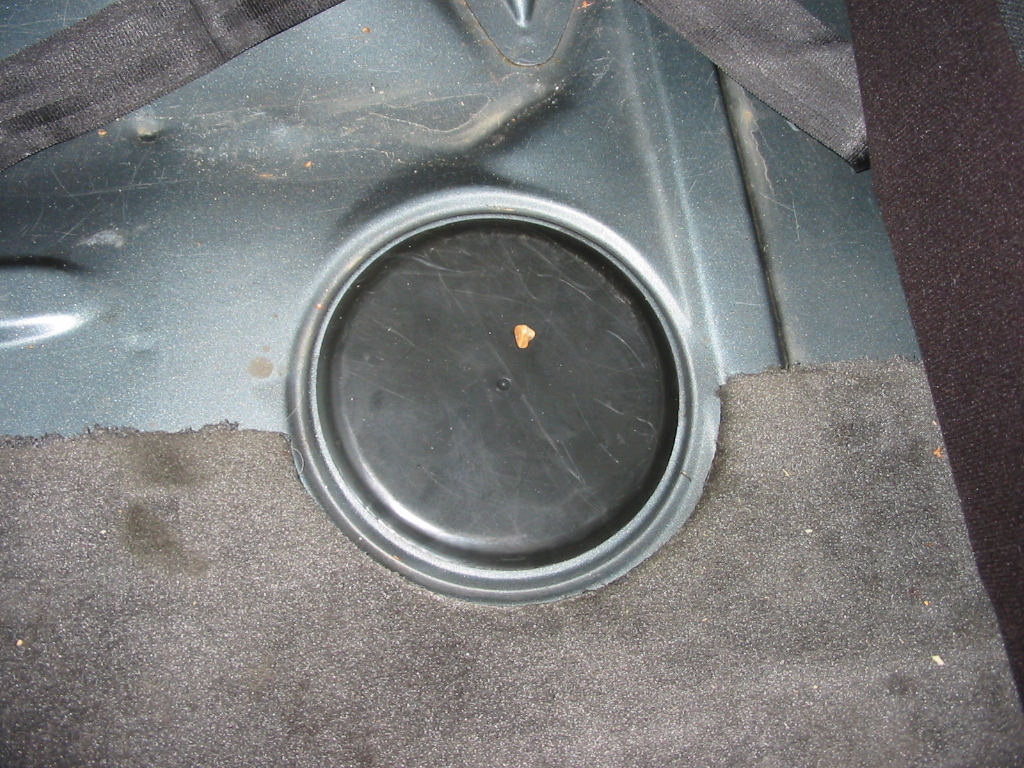
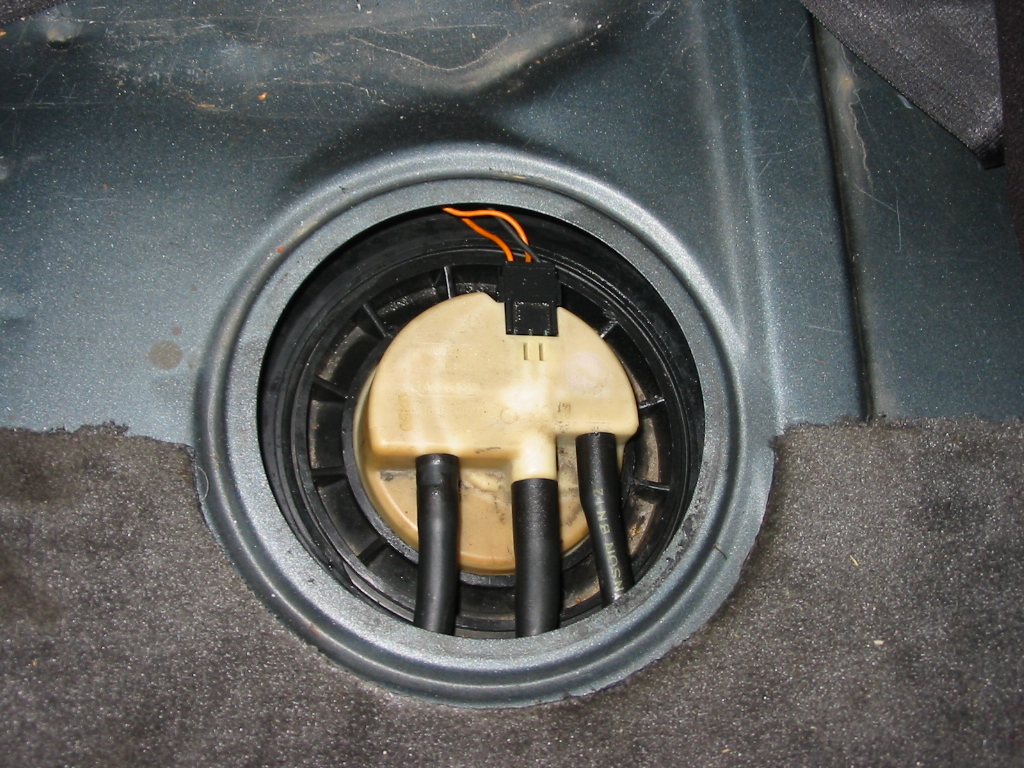
Go inside the car and flip up and remove the rear drivers side lower seat. Underneath will be a black plastic cover over the fuel sender unit. There are three hoses on the front of the unit and an electrical block on the rear. Unclip the electrical block off the unit and either tape it or put something heavy on it so it does not disappear under the car. Also remove the three pipes off the unit. I cable tied them together in the order they came off in, with a screwdriver in the middle hose so they also did not escape under the car. For your information the middle hose goes down from the sender unit to the fuel pump.
Next, under the car you need to remove the fuel filter and fuel pump assembly from the car. The fuel filter is held on by a clip, which is bolted to the car. On mine it was an 11mm bolt. Once you have done this, remove the fuel pump, on mine this was held on by a 13mm nut and bolt. Leave all the hoses connected for now so you dont have to worry about refitting them later on. You also have to remove the cages that hold the filter and pump in place, four 10mm nuts, 2 for the filter and 2 for the pump. Give them a good spray of penetrating oil as you want to keep the threads intact for refitting.
Now for the main part of the job, you will see the petrol tank is held on the car by five 13mm bolts. Two are under the rear beam, which can be quite awkward to get to. You can get a short socket or spanner on there but movement to undo these is limited by the brake lines on the drivers side and the rear brake compensator on the passenger side. A good tip would be to get your trolley jack and a piece of wood under the tank to support it while you take the bolts out. When you lower the tank slide the connecting hose off the auxiliary fuel tank after removing the jubilee clip on the hose. Be aware that the strap that holds the auxiliary fuel tank in place may well be corroded and fall to pieces when you start trying to move the hose off of the main tank. I would recommend loosening the strap or taking it off to save it falling apart completely. The strap is held on by a 13mm nut, which is up inside the rear arch.
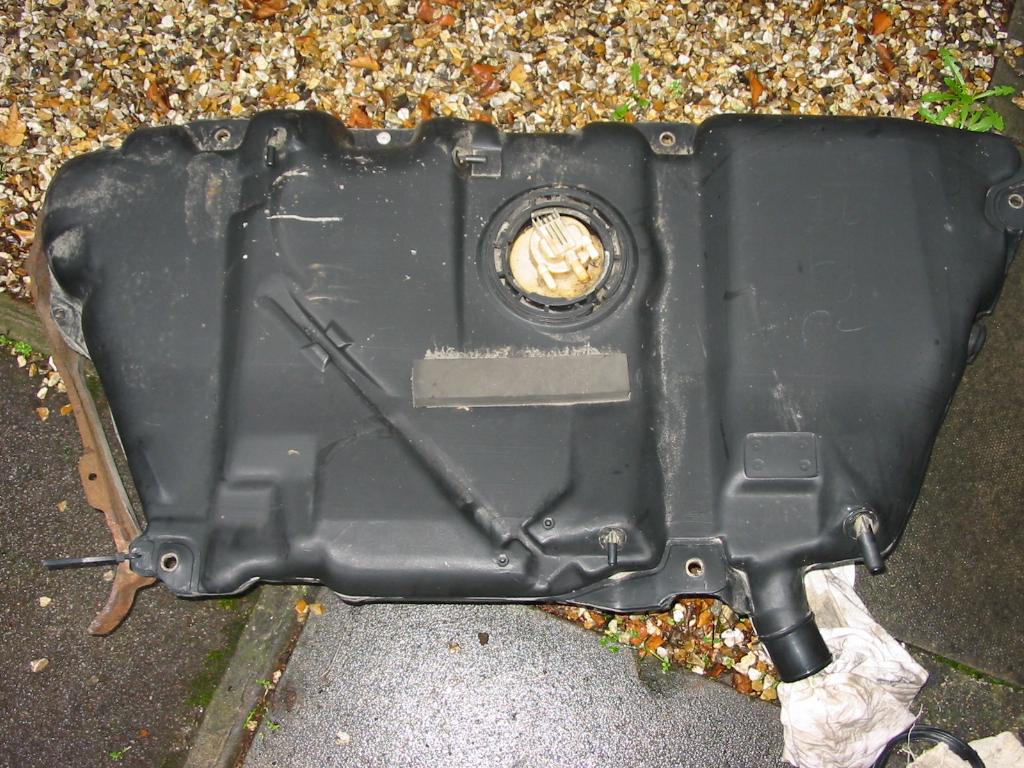
When you lower the tank, be aware that there are four vent pipes on the top (car) side of the fuel tank. Two are at the rear of the tank: one larger vent pipe which connects just above the connecting hose, and one small vent pipe which connects up on the middle of the tank. There are two more on the sender unit end of the tank. There is one long one, which runs the width of the tank from the aux tank. The other vent pipe runs from the sender unit to the passenger side of the sender unit. Most of the pipes are easy to remove as you lower the tank onto the floor the weight of the tank will pull them off.
Now you have the tank off you can either get it ready to repair it or get your spare tank to fit on in place. If you are fixing your tank I was advised (thanks Duncs!) to solder the yellow bung around the edges so it seals in place, and then cover the area in Araldite. I cleaned the area as best I could then, using the 'Woolworths special' 30 Watt soldering iron with about 1-2mm small pointed tip, melted the edge of the bung and the edge of the tank together until they were smooth. I used a circular movement around the inside of the bung at an angle so to smooth the two edges together. The edge of the tank is fairly thick so you'd be unlikely to melt all the way through. After mixing the Araldite together it was easy to spread it over the area to form a seal.
Before getting back under the car, make sure you have the all the vent pipes ready to go back on the tank. The hardest one I found was the long one that fits just under the rear seat. If you feed the pipe up into the car you can tie it up so you dont have to search for it when you want to connect it up. Hold the tank in place under the car and trolley jack the tank up so it is just touching the car. This should allow you some room for manoeuvre to get the vent hoses back onto the tank correctly. The hardest hoses are the connecting hose between aux tank and main tank and the larger vent just up from that. The filler hose takes some manoeuvring to get on, and the larger vent hose is obstructed by the rear suspension. You may have to take the drivers side wheel off to be able to get a hand on the hose.
Once you have the connecting hose on you should insert one of the nuts that hold the tank by the filter in place, but do not do it up tight. Put the vent pipes on the rear of the tank, then get inside the car and push the two top pipes on from the sender unit hole in the floor. You may need to hold the hose a couple of centimetres back from the end with a pair of pliers to push them on. You should now be able to get back under the car and fit the rest of the nuts to the tank. Be aware that in some cases not all nuts will fit as the tank may have warped slightly (especially a second hand one). With mine I could only get four out of five back on but I doubt very much whether the tank will fall off again! (Well lets hope not!) All you have left to do is refit the fuel filter and pump cages and then the filter and pump themselves. It is simply the four 10mm nuts back onto the car then the filter and pump. Refit the exhaust (if you had removed in the first place) and put some fuel in. Check for leaks, but these may not become apparent until you have more fuel in.
Things To Watch Out For:
Setting your handbrake up again may take a couple of attempts to get it right but its not too hard. Just remember that the cables cross over each other on the tank and go in the opposite side to the brake on the handbrake yoke. Also the clips that hold the cables onto the rear suspension will only hold the cables up one way round.
You may as I did put about 8 or 9 litres of fuel in when finished and get no reading on the petrol gauge on the dash. It can be one of two things:
A: the tank needs more fuel to get a reading especially if the tank was empty and you drained the aux tank before fitting.
B: the sender unit is faulty and needs checking.
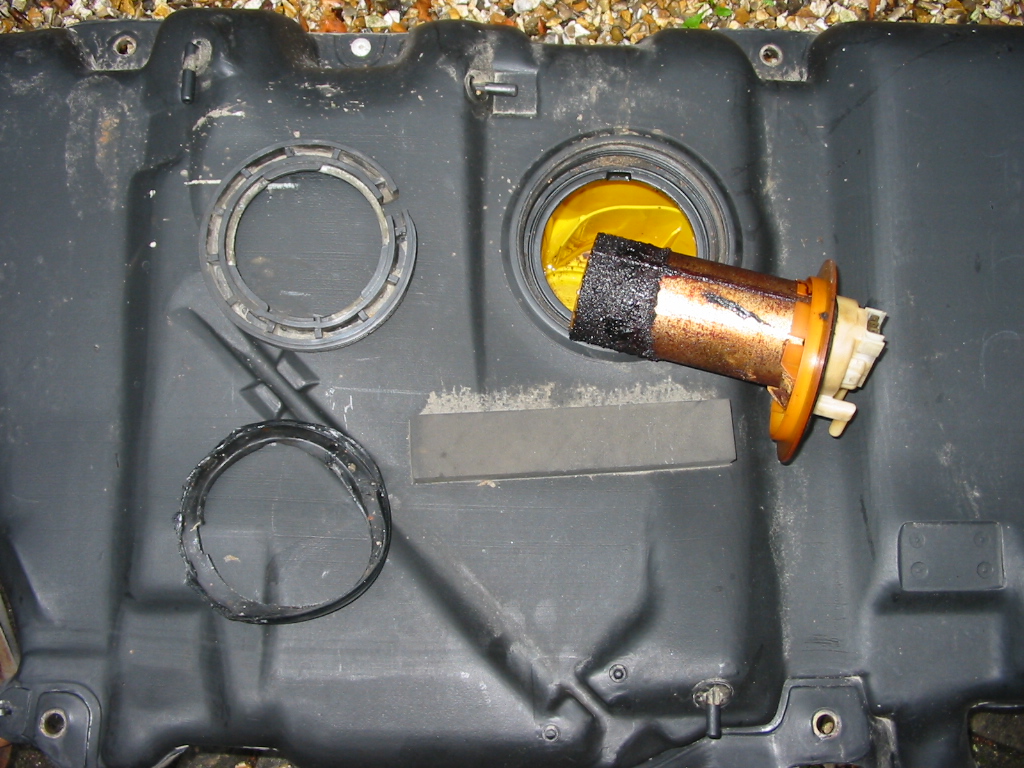
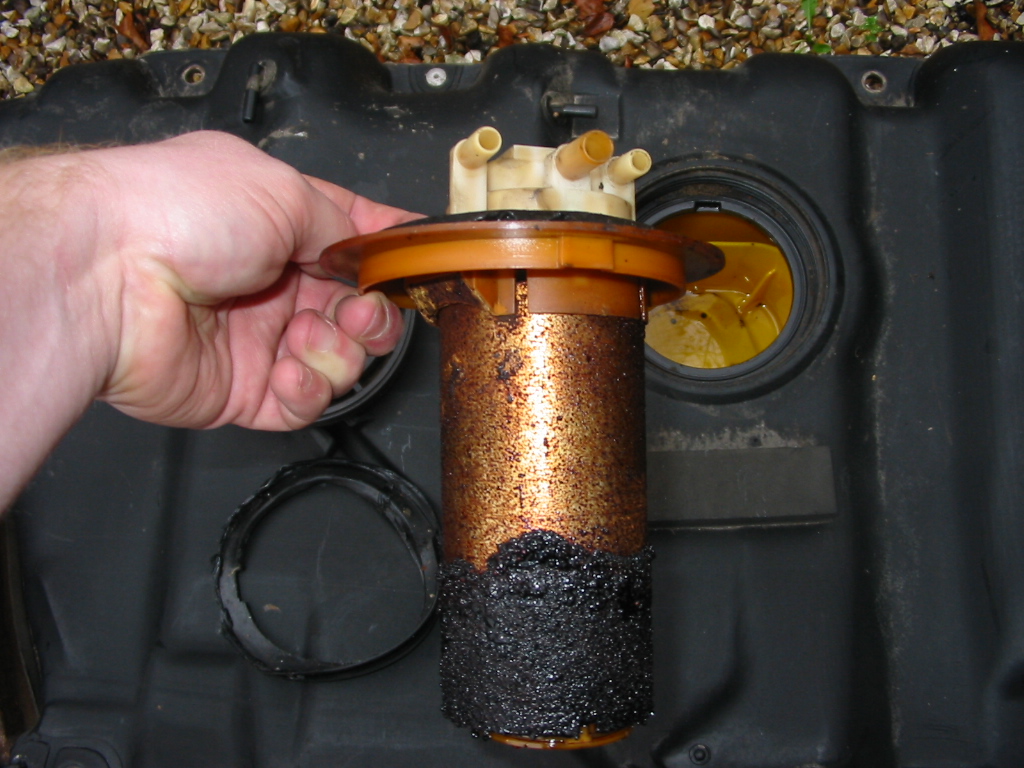
If you have a spare tank and unit, then swap the sender units over to see if it is the unit that is faulty or use a voltmeter to see if the unit is live. To swap the unit get a screwdriver and a hammer and you will see a large black nut, which you need to loosen by tapping gently on the end of the screwdriver in one of the sections of the nut. Take your time and not be too hasty, as you dont want to ruin the nut. With the nut off raise the unit out of the tank bringing the seal with it. This maybe perished and need replacing (part numbers can be searched for on the site.) The seal has a notch in it, which corresponds to a lug on the sender unit. Put the seal on the unit before you put the unit in the tank it makes locating the unit a lot easier. Replace or refit the unit and go for a drive to the local petrol station.
That is about it. When you have them off the car it may be worth changing your fuel filter and checking all the connections on the fuel pump are in good condition and that it's little internal filter is clear.
November 2004
Addendum
From TK of Tonbridge 18/02/2005
Do you have the leak out of the little yellow area of flashing on the offside of the tank? If so, before you get drastic, you might want to try this:
I went to Halfords and invested in some pikey instant metal/ rad fix/ fuel tank leak putty stuff (it's about £2). I then put the back of the car up on axle stands and undid the three accessible bolts on the leaking side of the tank. That gives you about 4 inches of play in the tank to work with. Then, knead your putty (all of it) together, and pull down on the tank a little. Simply jab all of your pikey putty in the little hole, and press it right in there.
Do up the three bolts.
Enjoy your leak free tank. Mine has lasted more than a year like this now.
And Alex of Chester
I'd try the putty to start with as its the cheapest option, if it doesnt work take the tank off and take it to have it repaired by a radiator/tank specialist. Thats what I did when mine leaked. They simply cut the outlet off (bit with the yellow bung in) and welded a plastic plate over it.
See thread
Andrew Isaac
Rear of car jacked up
The bung
The bung
Sender unit cover under rear seat
Sender unit in place under the rear seat
Sender unit nut
Sender unit removed. It's supposed to be clean and shiny!! And note in this tank that it's a baffled one. The yellow piece down the hole the sender unit was in.
Yuk!! What is all that stuff on there!!
Petrol tank
Top vents
Rear vents


 Reply With Quote