


Changing the heater matrix (alternative)
contributed by R A Steger
Here's an alternative method for changing the heater matrix. Not quite as messy as the other method, but still not that easy!
Reading Gary Broughton's 'How to replace the heater matrix' I recognised a lot of things. I also went through a history of mysteriously disappearing cooling water, finding this water in the interior and concluding on a leaking heater matrix. I also first bypassed the matrix until winter forced me to replace this part.
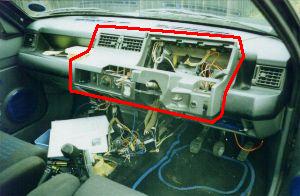
Fig. 1: Centre fascia
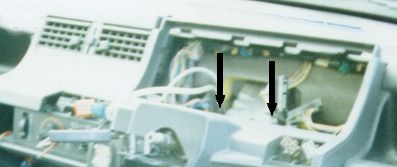
Fig. 2: Heater control cables
In replacing the heater matrix, I went through about the same stages as Gary did. However, a significant difference is present. Gary removed the complete fascia while I didn't. I only removed the centre fascia as indicated in Fig. 1. Most probably when designing the fascia, Renault did not intend to have this part removed. Still, it is possible, and it offers distinct advantages. The most important advantage is that of saving time. By removing the centre fascia, the rest of the fascia only has to be unclipped - not removed. Additionally all the cable work attached to the fascia's back can be left in place. This avoids all the work of unclipping these cables and of replacing them. Of course there also is a disadvantage. You may be left with visible damage to your facia. Because of this you will have to work rather careful at some stages, but for me this was outweighed by the time spared. I worked on it for about two afternoons from 13h00 to 17h00, totalling in about 8 hours of work. A fast calculation will make you think this saved me only 2 hours over Gary, but Gary already had the opportunity of 5 hours of practise on the first (and failed) attempt. I started the job completely unknowing, even without a copy of Haynes. Please take into consideration all advantages and disadvantages and decide for your self in what way you will replace your heater matrix.
In case you decide to do the job the fast way, you can use the following guide. It includes (almost) all work done. Only in case work was done different from Gary's description an extensive description is given, for the rest I would like to refer to Gary.
1. Disconnect the battery negative.
2. Remove the steering wheel.
3. Remove the centre console.
4. Remove the ashtray.
5. Remove the steering column shroud.
6. Remove all of the fascia switches.
7. Undo the cables running from the heater controls to the heater box. The two cables are both attached to the box and to a lever, see Fig. 2
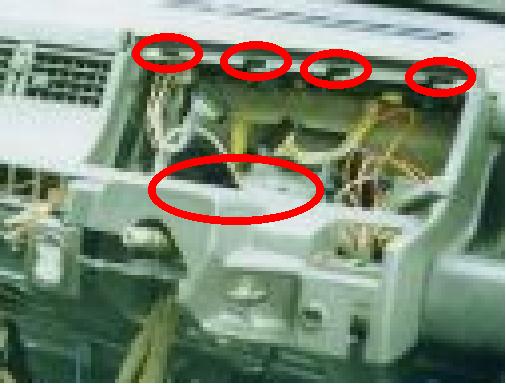
Fig. 3: Fixed fascia connections
8. Remove the centre fascia. It is attached to the rest of the fascia in a rails at both sides. Working your way up, you lift the centre fascia from this rails using a small screwdriver. A large part of this lifting can be done inside the fascia, however the last part has to be done on the outside. This has to be done very carefully to avoid damaging the fascia. Having lifted the sides, one will notice that the centre fascia is still stuck at the top and just above the steering column. These locations are illustrated in Fig. 3. Connections at these locations have to be broken, however when done carefully, no damage is visible after finishing the job. Finally, the centre fascia can be lifted. One will notice metal clips just above the centre ventilation holes, be careful not to bend them.
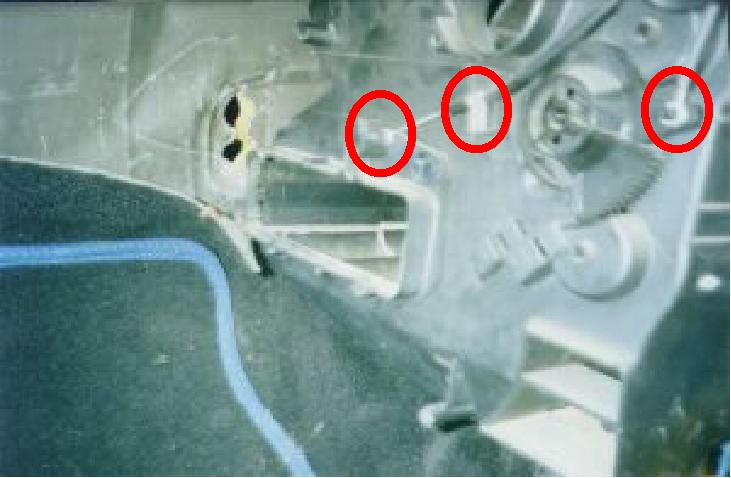
Fig. 4: Screw locations
9. Remove the (two) screws that connect the fascia to the steering column, see Fig. 4.
10. Remove the (two) lower fascia screws. These are just under the ashtray and above where the top of the centre console clips in.
11. Unclip the fascia. Two clips are located under the fascia at both sides near the door jambs. Three other are located on top of the fascia, just under the windscreen. When the fascia is unclipped, work the fascia forward for about 5 centimetres. You do not have to unclip any cables!
12. Remove the two bolts and two nuts attaching the heater box to the bulkhead. The two bolts are at the heater box's top, the two nuts are located lower. The two nuts are located at a difficult to reach place.
13. Pull the heater box forward, clearing the piping from the bulkhead. Now British car owners already can shift out the heater matrix. For continental car owners, the accelerator will be in the way. The heater box has to be turned a bit to enable slide out the matrix. After removing the old matrix the new one can be slid in.
14. As with almost everything in car mechanics, refitting is reversal of removal. Only be aware that when refitting the heater control cables, the levers' positions should correspond to the heater control positions.
Additional remarks:
* I purchased a used heater matrix at a scrap yard. The year of make was 1985 while the broken one was of 1986. There was a slight difference in model. Because of this, the new one did not fit in very easily - it was a bit too large for the heater box. I had to enlarge the gap for fitting it in properly. Make sure to get the right one.
* I paid about £10 for a used heater matrix while a new one would have cost me about £70 at the official dealer. For some reason I forgot to inform on prices at a general car part shop. Considering they would have charged me about half the dealer's price, I better would have bought a new one. Saving £25 is not worth taking the risk of having to do the job all over again in case the used part fails already after a short time. And such a failure is not unrealistic - proven by the many matrix failures.
* Because my new heater matrix initially did not fit in, I removed the entire heater box. For this, one also has to remove the rack hosting two cable connectors mounted on the heater box. Removing the heater box gave me the opportunity to lubricate the inner turning points. This solved the previous problem of the temperature control getting stuck at the high temperature position once the matrix got hot.
* Of course I'm obligated to mention Gary Broughton's 'How to replace the heater matrix' as the prime source for writing this DIY guide.
* In case this description is not complete or you have any questions, please contact me at r.a.steger@student.tudelft.nl or at rasteger@hotmail.com.
Console
Facia2
Facia
Heater


 Reply With Quote