


Right we all know the stories about blowing headgaskets,well it need not happen,most headgasket failure is down to poor fueling,pure & simple. (can also be down to water problems but we are not going into that here)
In this thread i hope to cover some of the basics of changing the main & air corrector jets, i must stress though that if you do this i cannot be held responsible for engine damage,nor can RTOC
Right here goes,as i said previously, you can change two jets to allow more fuel into the carb,the MAIN jet & the AIR CORRECTOR jet.If you have a wideband controller you can also drill the fixed 2nd stage bush to allow a smaller main to be used as this fuels 'on boost' the 1st stage is probably best left alone.I will show the basic jet change 1st & go into the 2nd stage later as it is fiddly & if you mess up it cannot be replaced easily as it is fixed into the main carb body!!!
Tools you will need are;
long handled flat bladed screwdriver
12mm socket/spanner
10mm socket/spanner
Small drill bits (ebay)
drill to take small bits (dremmel or such like)
PROB BEST TO FIT A CARB OVERHAUL KIT AT THE SAME TIME AS DOING THIS>
CARB REMOVALL
If you have a strut brace remove it,unless its a genuine devil one.
Undo boost hose from the plenum
undo the 3 10mm bolts/nuts from the plenum that go into the carb,remove plenum
remove accelerator cable from the throttle linkage
undo the end of the spring thats attached to the throttle linkage
pop the choke cable off the choke mech & then CAREFULLY undo the clip that holds the cable..you don't want to loose the clip!!
remove any vacuum hoses attached to the carb
undo the fuel hose on the left & put it out of the way somewhere,if you have the anti-perc fan don't let it drop into the hole as it is awkward to get back out :wink:
undo the two water hoses at the base of the carb & try to hook them up out of the way(this will also stop them leaking as much)
at the base of the carb there are two bolts,undo these & you should be now able to remove the carb,it will have a float chamber full of fuel so don't tip it upside down.
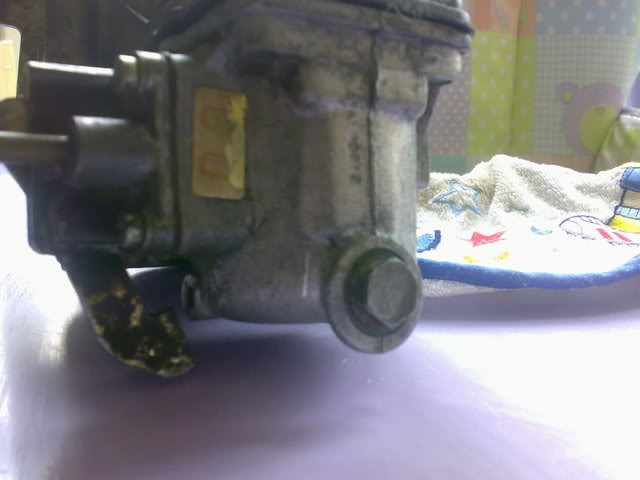
THE MAIN JET
This jet is located at the bottom of the carb & is accessable via a 12mm nut.
**NOTE** When you undo the nut for the main jet have a bowl ready or do it outside as there will be a fair bit of fuel inside.
Undo the nut & put it somewhere safe,don't loose the washer,replace the washer if possible as if its old it may leak when you tighten it back up,it's just a copper washer so any motor factors will have one.
The main jet is accessable with a long handled screwdriver,if you look into the hole where the bolt was you will see the main jet.
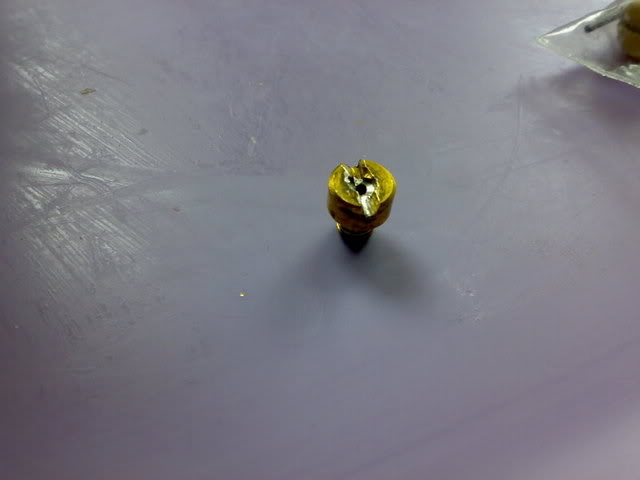
Unscrew it & Tip the carb on its side & give it a shake till the main jet comes out.The one in the picture has been sodered & re-drilled.
Now either you can buy a main jet from the likes of K-tec or you can buy some mini drill bits & drill it yourself,1.3/1.4/1.5 are the usual suspects if you are just doing it the easy way (the hard way involves drilling the 2nd stage & using wideband,i will try to cover this later)
If you drill it yourself & find its drilled to much you can use solder to fill the hole & then re-drill it :wink:
:?: Unfortunatly without knowing how YOUR car is running or what mods you have i cannot say which jet will suit your car best.
When i 1st got my car i had a 140 main jet in it which fueled ok for 16 psi+ but to be honest it was rich all the way through,not a bad thing if you want to keep the headgasket in one piece, so if you don't have a wideband controller or easy access to one maybe a 130/140 main with a smaller a/c will do the job for you to fuel over 16 psi.
To replace the jet & carb it is just the reverse of above.
You also may have to mess with the a/c jet to get it to run well,here's how.
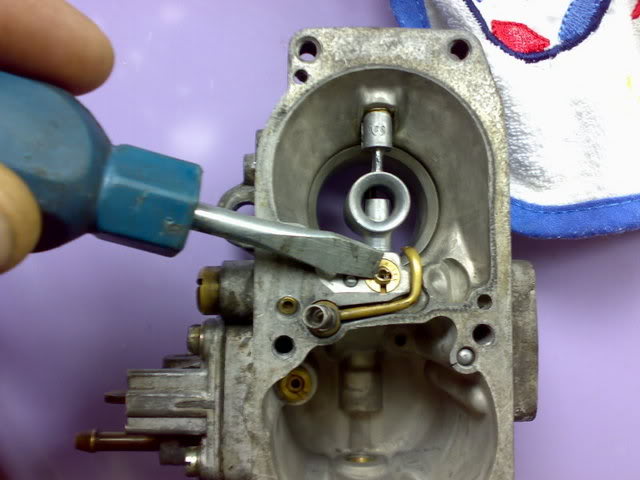
THE AIR CORRECTOR JET (Iwill also reffer to it as a/c jet)
You can do this with the carb on the car but it is fiddly & a bit awkward as you have to make sure the gasket stays in the right place all the way round & with the float flapping around it can be awkward.
If the carb is on the car remove the plenum & fuel line as before.
On the top of the carb you will see 6 screws,undo these & remove the carb top,inside you will see a small brass bush with a slot in the top,this is the a/c jet & as standard is 1.25mm,you can either buy a new,smaller one or solder it up & re-drill it,this is a very fiddly process & you don't need alot of solder in it so don't over do it!!
:!: To remove it carefully unscrew it,try not to mash the top if its a bit tight!!
:!: Also don't drop it down into the carb if you still have it on the car!!
Drill the jet to 0.9/1.0/1.1 etc. you get the idea,this is where a roling road or decent wideband controller would be very handy as you can check the fueling after every change to get the optimum out of the carb!!
When you refit the a/c jet,don't drop it into the carb venturi if you still have the cab on the car :!:
again refitting is the reverse of above.
You will prob need to adjust the mixture screw or idle if the car is a little low on revs.
2ND STAGE
Now for this part we need a wideband controller* really as we can use smaller main jets & the fuel must be check properly,no 2nd guessing here i'm afarid.You also deffo need a carb overhaul kit as we will be stripping most of the carb down to reach the jet/bush.**Also worth noting that this is a FIXED bush so once drilled it cannot be fixed with solder,you can drill it out & tap a thread small enough for the a/c size jet to fit but this is very fiddly & you will get alot more swarf in the carb.
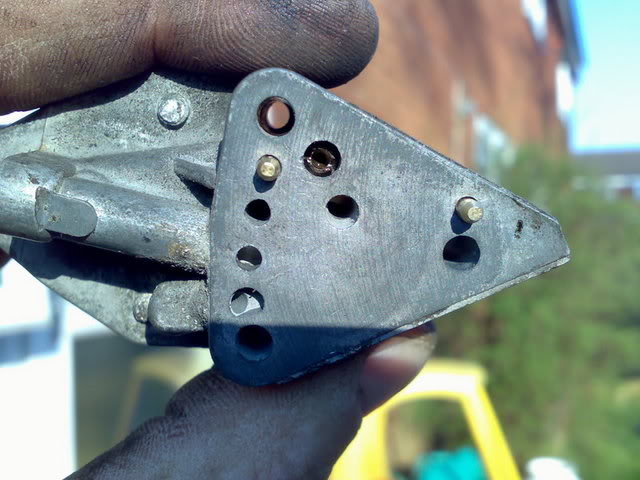
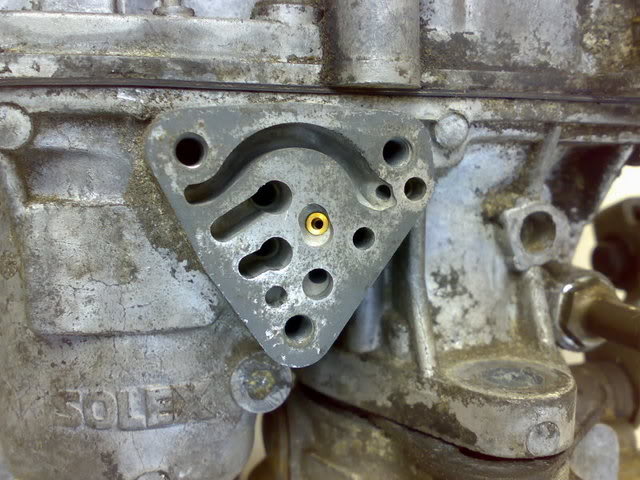
The bush is located in the side of the carb with the triangle shaped part,undo the 3 screws holding this in place.
Inside the part that comes away from the body is the 1st stage & is the same as the a/c jet except this is 1.0mm instead of 1.25,(some Group A carbs have the 2 jets swapped over, not ideal really.) Leave the 1st stage alone for now.
Here you can just see the 1st stage jet.
The 2nd stage is located in the carb body,its a small brass bush & is normally around 1.0mm,with the aid of the wideband controller you can enlarge this to suit your 'on boost' conditions without having such a large main jet,thus improving 'off boost' fueling/economy.
Start with 1.1,drill this slowly & carefully,this way you won't get too much of the swarf going into the carb,give it a good blast with some carb cleaner after to get most of the smaller bits out,you may have to take the carb off a couple of times & clean it to get it all out,or if you're carefull enough the carb cleaner will do the job.
2nd stage (fixed bush)
Put it all back together & make sure its all tight etc,run it up,you will prob have to adjust the mixture screw & maybe the idle as well.
Test it on the road with the wideband,idle you want high 14's (some cams may want to idle in the high 13's) , light throttle you want 13's really, same as boost starts to come on & as it rises the afr's should drop,at WOT in 4th/5th you want to see 11.9 to 12.5,certainly no higher & 12.1-12.4 are best on most engines for making power.
Do the test in lower gears 1st (2/3rd)just to check the afr's as there's no point thrashing it on afr's of 14's on full boost,this will damage the engine.
Then you need to test in 4th gear to the max RPMS you are going to rev to, my car was fine up untill 6k in 4th , then it would lean out, i revved it to 7k on the strip... I ended up with a 2mm needle to help fuel, but alas it still wasn't enough for 24 psi..Anyway...
This is a bit tediuos if you don't get it right 1st time & more often than not you won't 1st time so it means taking the carb off & trying different combinations of jets,as a rule the 2nd stage doesn't want to be larger than 1.4mm & you may gain from making the 1st stage smaller,you may not,it's all trial & error i'm afraid as every car is different!!
At the moment i have lost count of the times my carb has been off & in pieces,
My spec now after many,many changes & tweeks;
120 main
.9 a/c
1.0 1st stage
1.40 2nd stage
25mm venturi ~(standard)
2mm needle jet
I fuel for 24psi but it still leans out at the moment 6k rpms in 4th so i am trying some other mods at the moment to help fuel it up there.
All carbs are different as are the cars they are fitted to in the GTT world so i cannot give anyone sound advice on what jets would be good to use,it would just be an educated guess,the only way is to use a rolling road or even better invest in a wideband controller.
I took an MSM carb apart the other day & the spec was as follows
1.5 main
0.9 a/c
1.25 1st stage
1.2 2nd stage
27.5mm venturi
This was kicking out loads of black smoke & was badly overfueling!!
Also with the larger bored out so called 'grp A' carbs at very high boost they have been known to empty the float bowl,this can be remedied by either finding a 2mm needle jet/valve or very carefully drilling it out larger,although it is known to be very hard to get the ball bearing to seat properly after causing fuel to leak & overfill the bowl on idle/low rpms etc.
My 2mm was fine, but when i tried a larger (2.1, 2.2 & 2.3) none of them sealed & i had flat spots/bogging between changes.
I hope this is off help to some & is easily understood.
************************************************** **********
UPDATE 4/6/08
After a few more experements with jetting (between me & James) I am about to try a 120 main,125 2nd stage, 1mm a/c & 2mm needle jet, James has had good results up to 20 psi with this set up (he has a 1.9 needle) with high 11's low 12's @ WOT @ 7k rpms @ 20psi.
I am aiming for 23/24 psi so may have to drop the a/c to .9 or enlarge the 2nd to 125.
The above didn't work for me, i had to go to a 1,40 main & .9 a/c with the 2mm.
************************************************** ***********
I also had my wifes standard carb on my car to test it & with my mods it was lean (14/15' AFRs on boost) at 1 bar boost(manifold) so be very careful with advice given by people saying the standard carb will be fine to 1 bar boost,i have proven that with a few mods it just isn't!!
Although a standard car with standard cams/turbo exhaust etc may be fine for 1 bar boost, this i cannot be 100% of though.
Also take into account a tired fuel pump/regulator & a manky old fuel filter & you could be running lean on standard set up.
I personally would put a new filter in at the very least as piece of mind,then maybe an uprated pump (they cost as little as £80) & have the fuel pressure checked on boost,i believe fuel pressure should be 4psi above boost pressure.
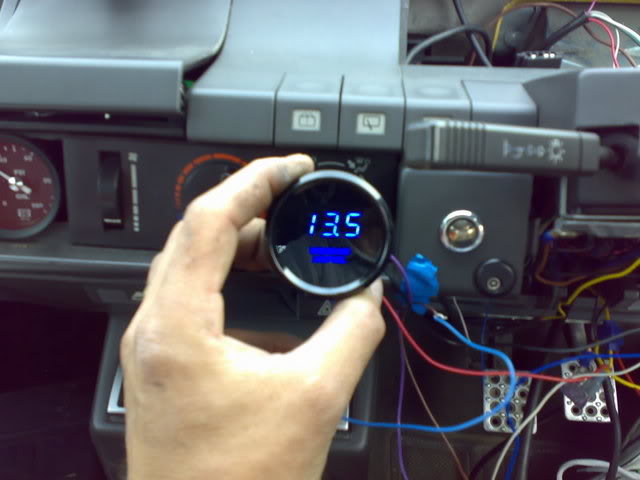
* A Wideband controller is a Wideband lambda sensor you have to fit in the exhaust,usually about 6 inches or so from the turbo at a 2 or 10 o'clock position,this then sends the data to my lc-1 controller then to a display so you can read it,can also be attached to a laptop. NOT to be confused with cheap NARROWBAND AFR gauges, they are NOT the same.
My Wideband display
**I would just like to add a big thanks to, in no particular order, Mart, Scoff,Andy & Rob from RTOC for the advice when i was doing my carb, without them this post wouldn't have been possible.**
Also worth noting that my carb was hunting a little, this was down to the carb not sealing to the manifold, even with new gaskets, all i did was add a smear of gasket sealant between the gasket & inlet/gasket & spacer & spacer to gasket, i didn't add any to the carb base as i didn't want to block anything.
The mixture screw can sometimes cause problems as well, they are only 88p from renault though.


 Reply With Quote
 ) brass bush that is located in the carb body, visible once you've removed the enrichment section described above.
