Page 1 of 2 12 LastLast
Results 1 to 50 of 93
  1. #1
    Non-member jamie_clioGTT's Avatar
    Join Date
    Nov 2010
    Location
    Burntwood Staffs
    Posts
    468
    Post Thanks / Like

    Project: Is it all there.

    Hi,

    Thought I would start a thread of my current project, firstly a bit of background on myself.

    Some of you may remember my clio on which i put a renault 5 GTT engine in, i used it as my daily for two years. we had our ups and downs but to be honest, mostly ups. was great fun but i started needing a car to do more miles in so i took this off the road with every intention of getting it resprayed etc, anyway i bought a peugeot 306 gti6 and used it for a few months, i then got a new job which came with a company car. crunch time, do i keep the 306 and make a turbo project with it, or carry on with the clio.. love was low with the clio at this point so that got sold and the 306 went into the garage. spent some coin on suspension on it then realised its really not for me, just did not enjoy driving it enough to make it into my toy.. so i soon sold it on.

    I had the itch to do a resto job and the only thing that seemed suitable for me was a 5 so started asking about on facebook, then somebody on the rtoc fb page got in touch with something that sounded ideal for me.. Car was in need of alot of bodywork tlc but it was already stripped down bare and come with a nice list of goodies, so friday just gone i went to pick it up.

    heres a few pictures the guy sent me of it on his drive (genuine nice/honest guy who is a member of rtoc)


    All went fairly well with the pick up, 2.5 hour drive up to get it but you wouldn't believe how heavy a rotten renault 5 shell is as we had to lift it on to the trailer..

    Anyway, all home now and saturday evening work began.

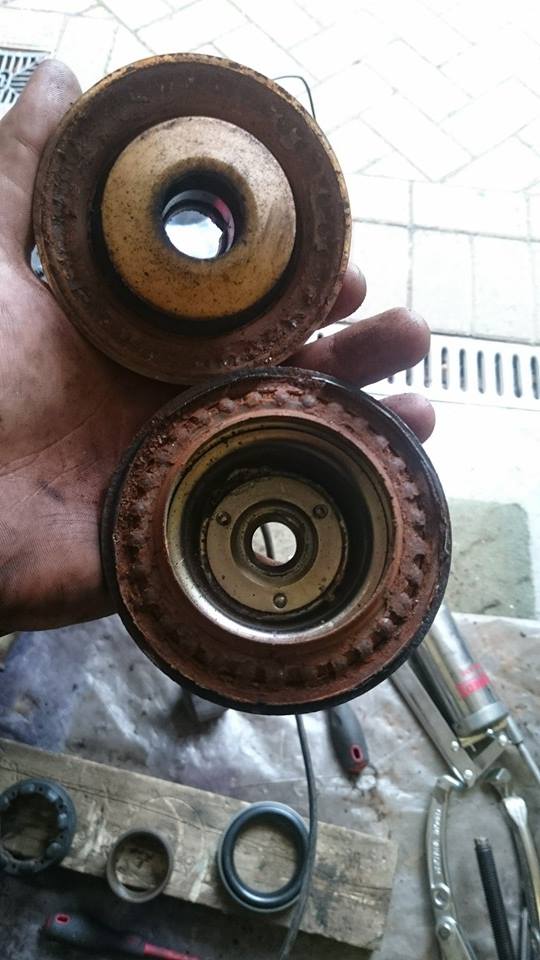
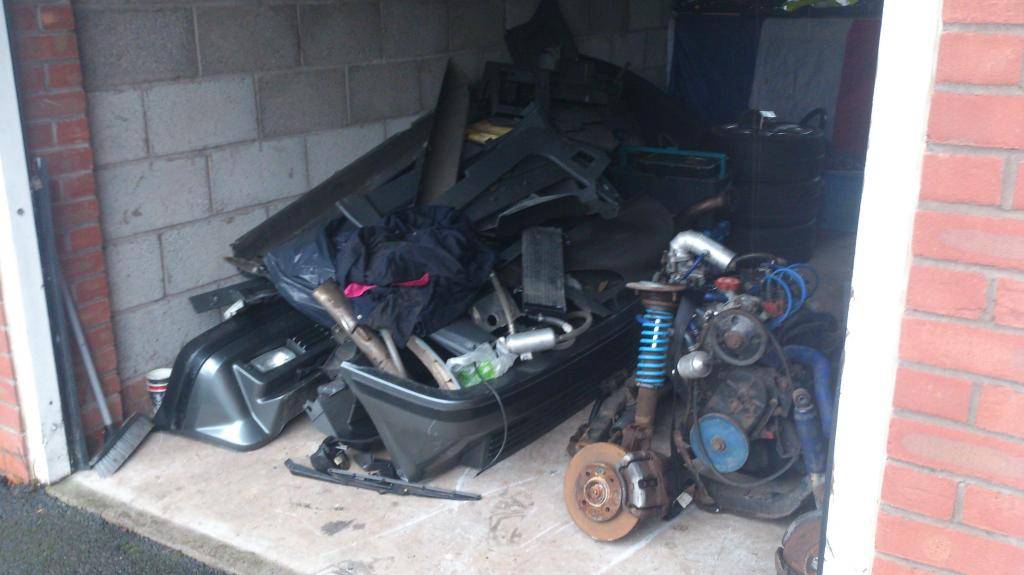
    My garage full of parts


    I have been lucky enough to be able to store the car at my girlfriends nans as to be honest i didnt really think it through how much space i would actually need.

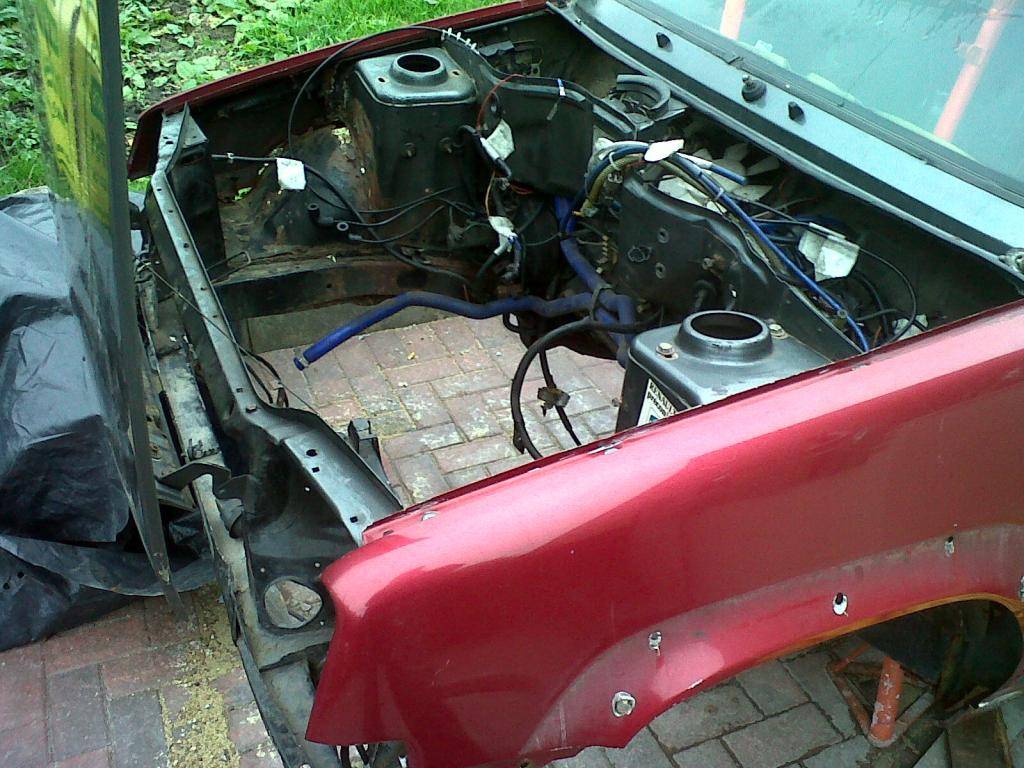
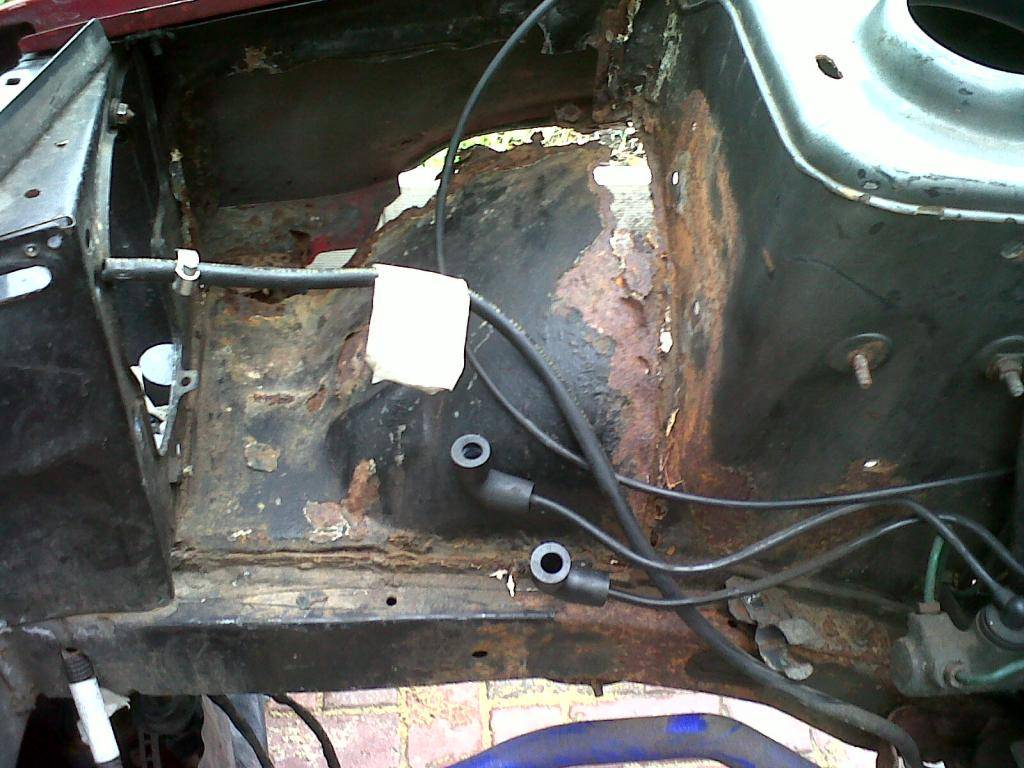
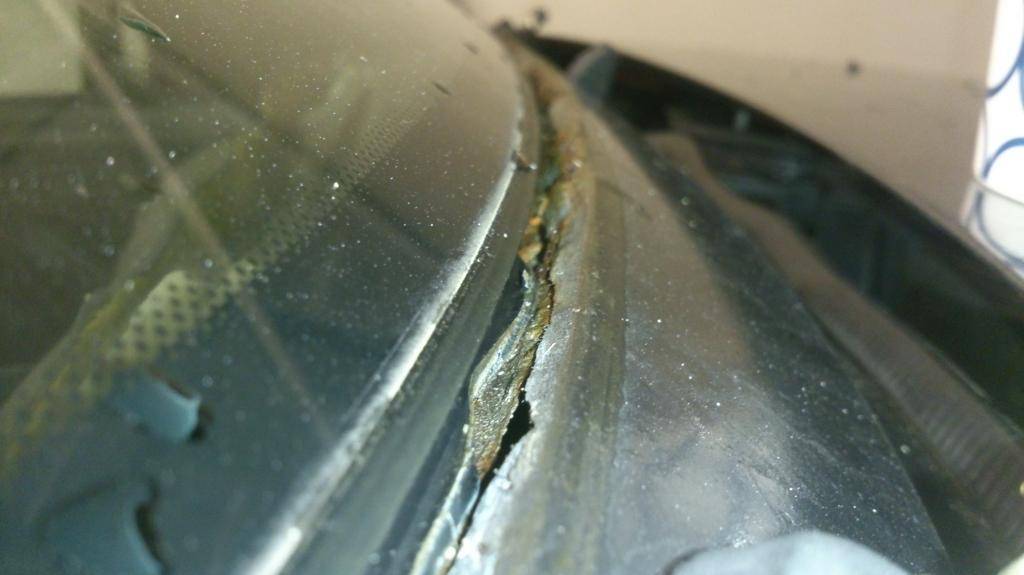
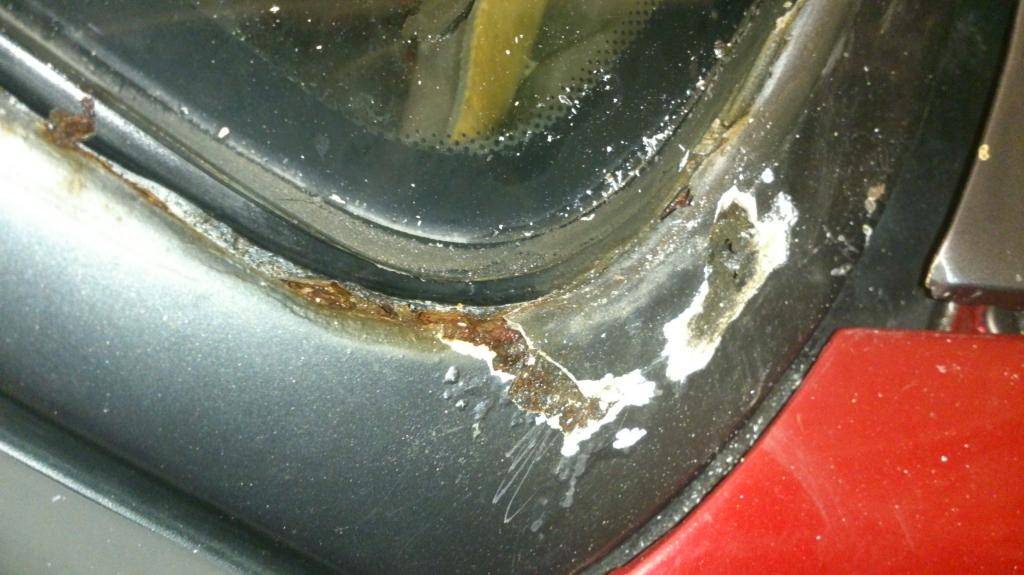
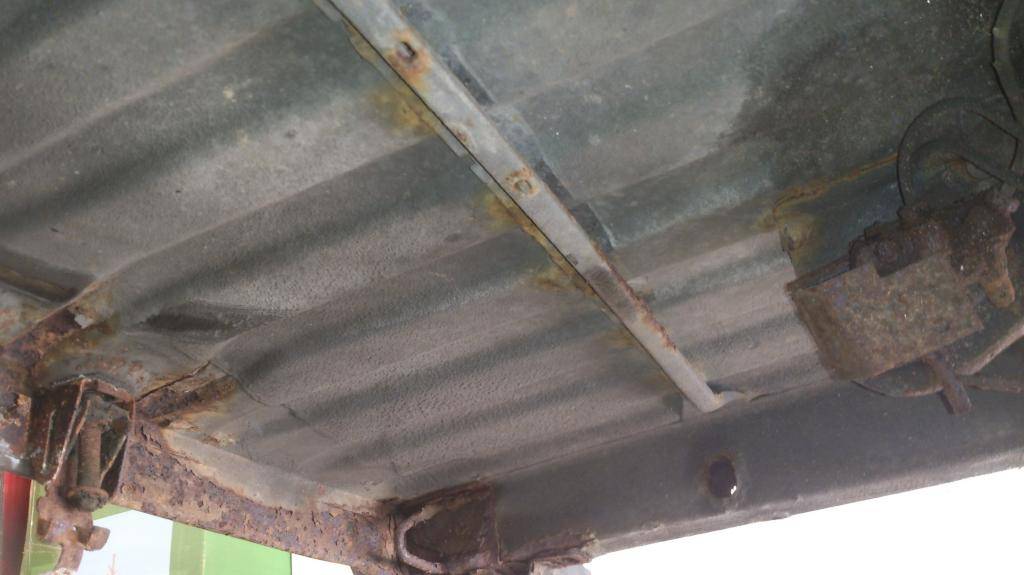
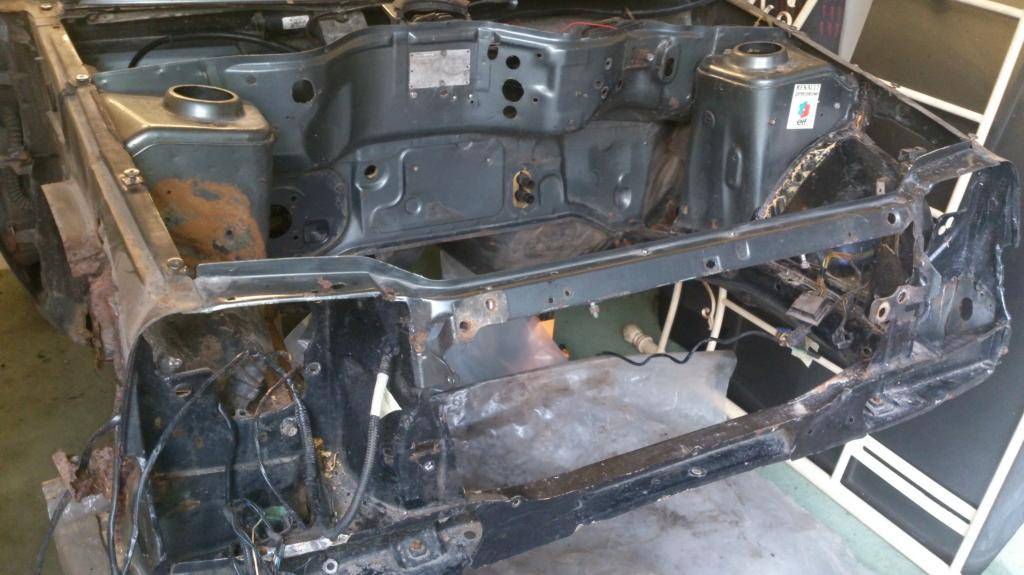
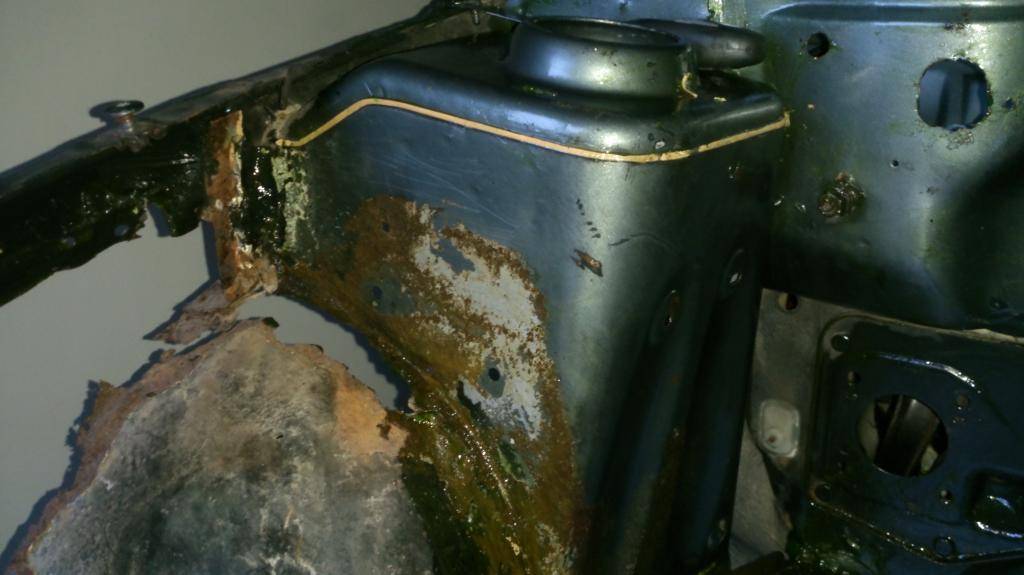
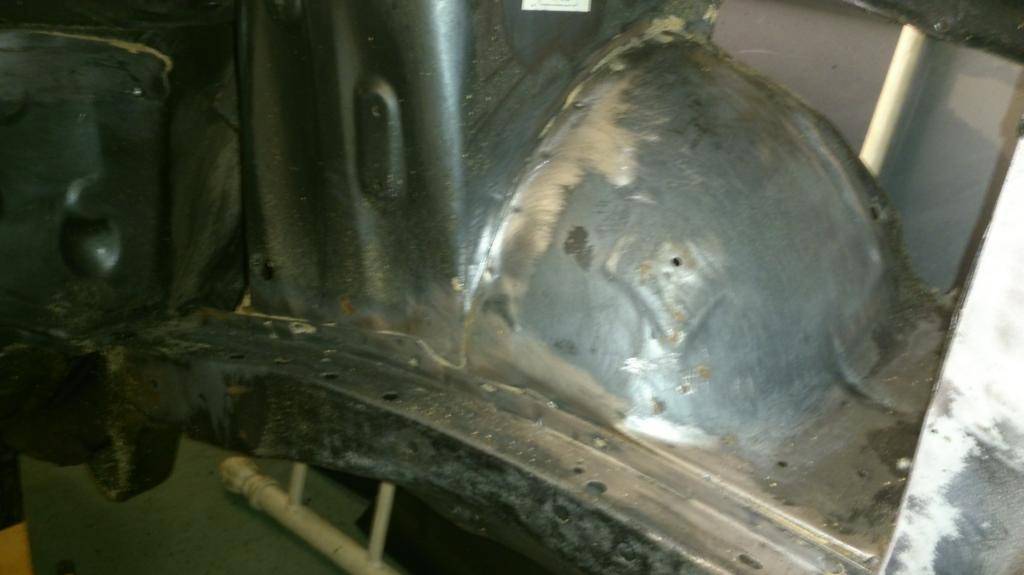
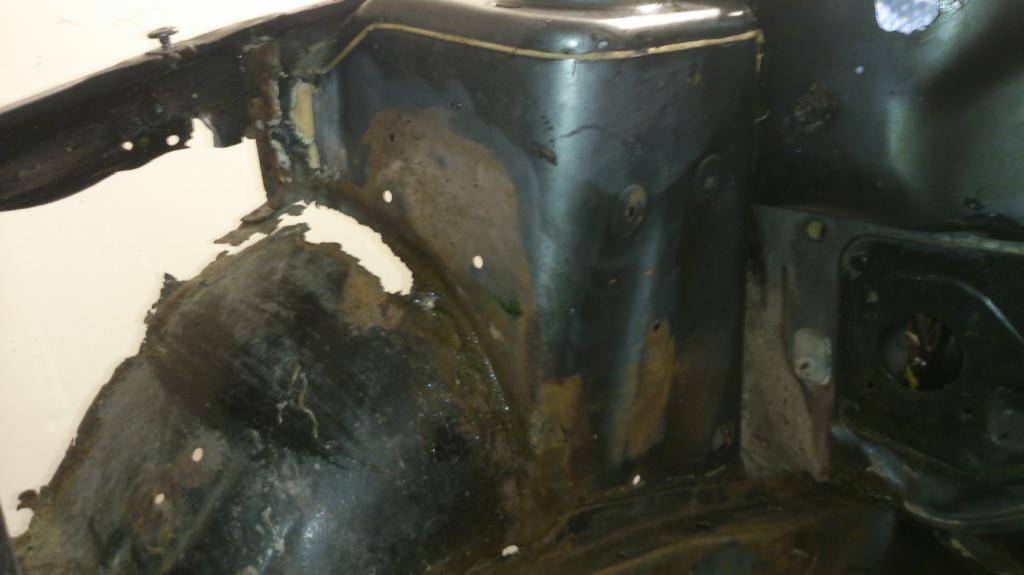
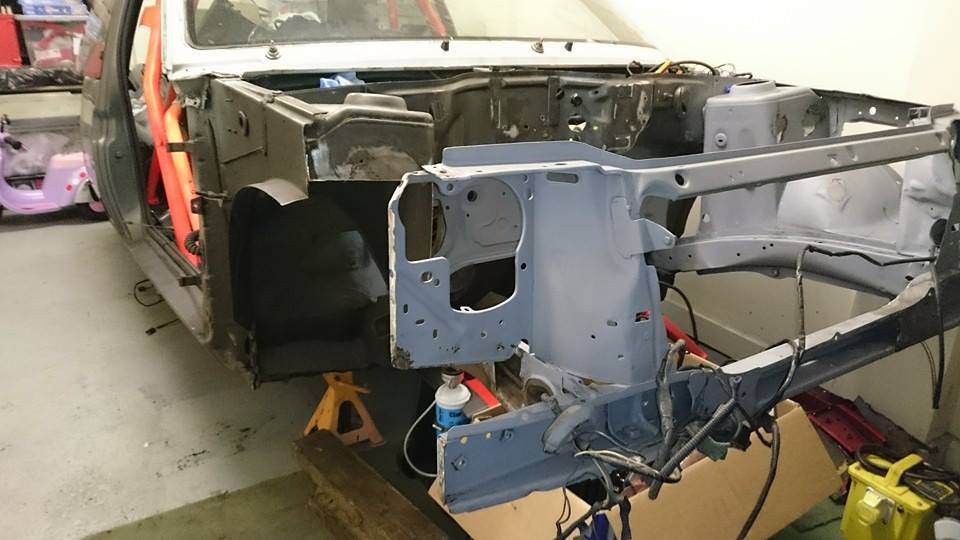
    The dreaded rust pictures.


    you can see in this picture the surround has previously been badly repaired with filler.


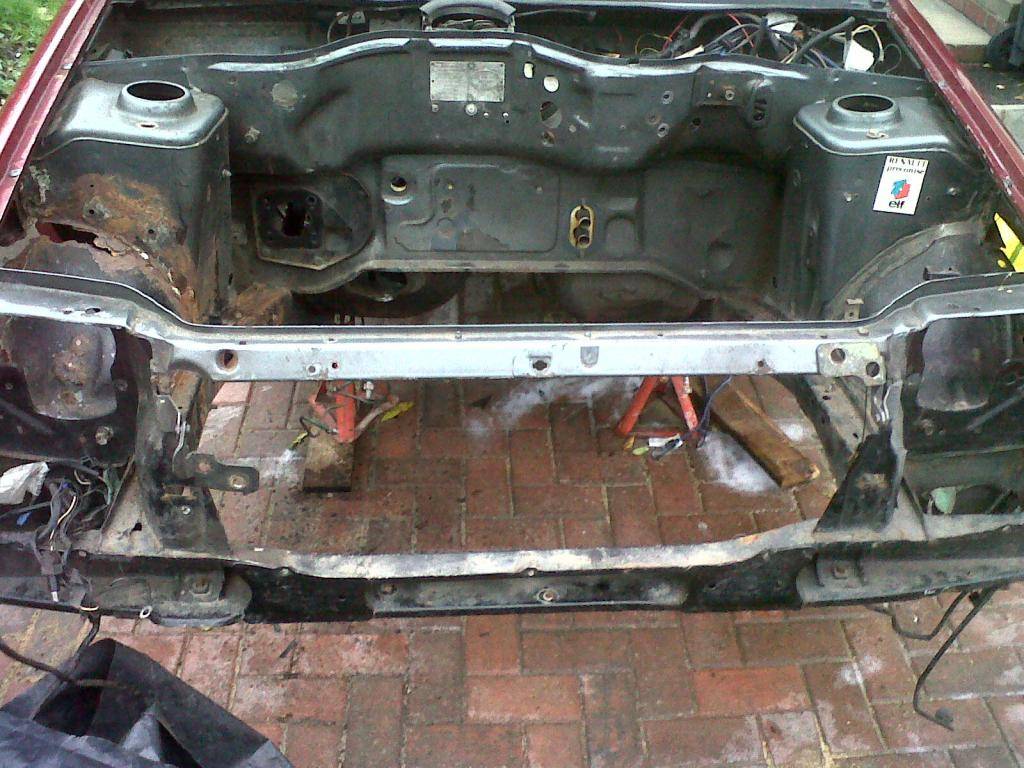
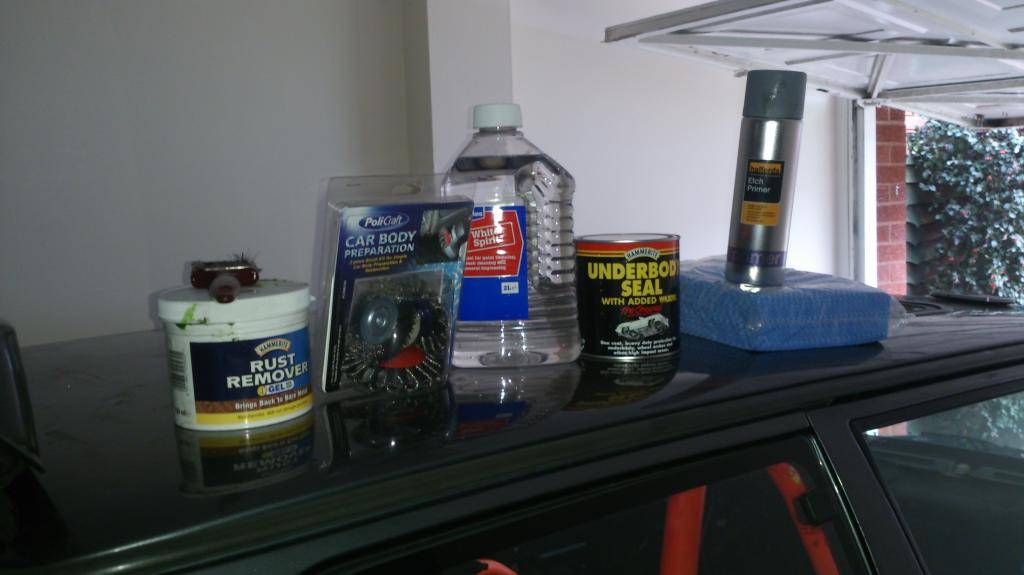
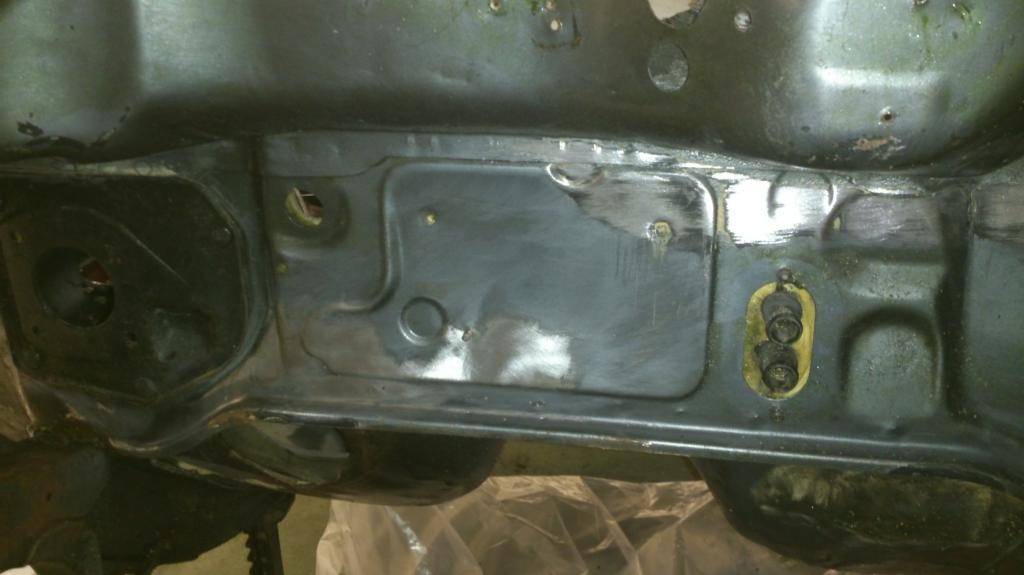
    So my first priorities are to get the underneath clean, treated and painted so i can think about getting it back on the wheels to make it easier to work around, so a trip to halfords/wickes


    Absolutely coated the whole engine bay and underneath in the hammerite rust remover and i had about half an hour with the wire wheel attachment in the drill, many more hours of brushing left but its heading in the right direction.

    Before and durings as its far from finished.


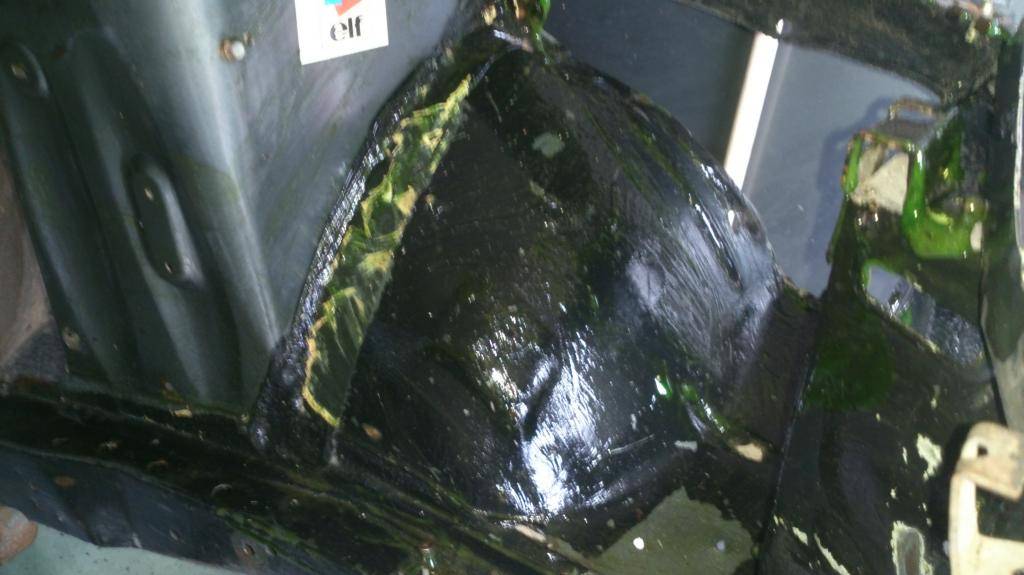
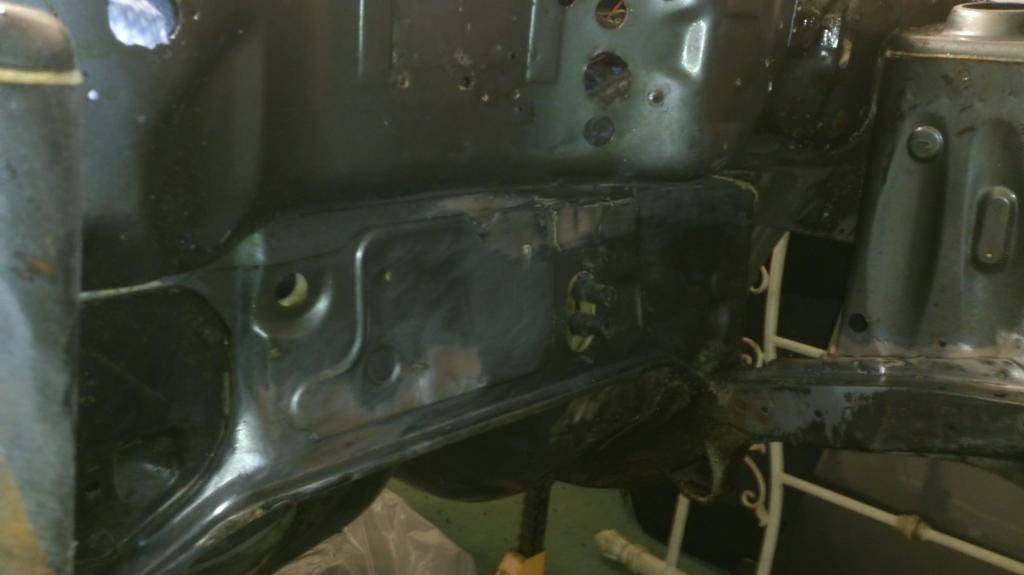
    I have started getting rid of all the sealent from the engine bay as i can not stand the stuff, i think it looks terrible, i will put some more on but in a much better fashion and make it less of a water trap!

    before


    During


    So next on the list is getting a replacement inner arch and windscreen repair panel and getting them welded in,

    Anybody selling a mig welder?

    The spec list of the engine is as follows and i have the reciepts and have also checked to back up what was sold to me..

    Piper 285 cam shaft
    Piper updated valve springs
    Gdi lightened flywheel
    Gdi gas flowed head
    Gdi up rated clutch ( Valeo type)
    Head skim
    Updated head bolts 12.9nm
    T3 turbo
    Braided turbo feed hose
    2.5 turbo downpipe
    Re-bored turbo elbow
    Oil pump stripped uprated new internals
    New timing belt & tensioner big end main and thrust bearings replaced
    Full bottom end set
    Knife edged crank
    Group a dump valve
    New water pump
    Turbo manifold stainless steel gasket
    Turbo elbow stainless steel gasket
    Uprated copper head gasket
    Carburettor copper gasket
    Under bonnet bleed valve fed into car adjustable boost
    Ktr alloy carb elbow
    Full Samco silicone hoses all over
    Induction kit
    Alloy oil seperator
    Polished alloy water swirl tank
    Ktr side exit exhaust
    Uprated copper core radiator
    Oil cooler
    Low temp fan switch
    Low temp thermostat
    Magnecore leads
    Aquamist water injection race pump (es1)
    Ktr power system group a carb
    Omex rev limiter
    Pace twin inter cooler system secondry inter cooler ice blue water cooled 1st inter cooler has water sprayed into

    As said with spec lists when buying cars i usually take with a pinch of salt but everything so far appears genuine with reciepts and my own looking to back up what ive been sold.

    So this is where im at with her, i am a complete novice with this sort of work so any feedback/advice good or bad is totally appreciated, i am not sure what route im going with it to be honest but it certainly wont be OEM, i dont have the patience for that

    Hopefully have another update by the end of the weekend.

    Thanks for looking.

  2. #2
    East Midlands Area Rep Mr Raider's Avatar
    Join Date
    Sep 2008
    Location
    Norwich
    Posts
    2,062
    Post Thanks / Like

    Re: Project: Is it all there.

    Great thread and start to the restoration, has certainly got a few goodies too. What are the sills like mate?

  3. #3
    Non-member jamie_clioGTT's Avatar
    Join Date
    Nov 2010
    Location
    Burntwood Staffs
    Posts
    468
    Post Thanks / Like

    Re: Project: Is it all there.

    Thanks the sills are, erm.. like swiss cheese but im wanting to get the surround and inner arch sorted first. then i will move onto doing the sills.

  4. #4
    Non-member
    Join Date
    Apr 2011
    Posts
    1,214
    Post Thanks / Like

    Re: Project: Is it all there.

    Good read so far, I do like a weldathon project thread keep the pics flowing regularly.

  5. #5
    Non-member jamie_clioGTT's Avatar
    Join Date
    Nov 2010
    Location
    Burntwood Staffs
    Posts
    468
    Post Thanks / Like

    Re: Project: Is it all there.

    Cracked on a bit today, I say a bit, spent about 9 hours in the garage and didn't seem to get very far at all

    Started wire wheeling the engine bay to get what looks like emulsion off that has been put all over the bay, also started getting rid of more sealer, everywhere i take the sealer off there is rust patches, mostly surface rust but i have found a few more holes.

    I'd recommend anyone doing a resto job on a 5 getting as much as the sealer off as possible to check behind it.

    a few pictures of the bay, still far from finished.


    The following picture does show that its come a far way to when i started..


    I then had another go on the floor pan, for some reason there is like a thick gloopy substance, probably a mixture of oil and underseal, im not going mental with it but trying to get as much off as possible so the new underseal will stick..


    Will put in another shift tomorrow and hopefully get the floor pan ready for paint, hours of paint thinning and scraping to go.

    I have also ordered a replacement windscreen surround and inner arch so when the floor pan is done and most of the engine bay i will be making a start on preparing to get the new panels in.

    cheers.

  6. #6
    Non-member
    Join Date
    Oct 2008
    Location
    Farnborough
    Posts
    706
    Post Thanks / Like

    Re: Project: Is it all there.

    "I then had another go on the floor pan, for some reason there is like a thick gloopy substance, probably a mixture of oil and underseal"

    Yep, exactly the same as mine. I found the best bet was to just scrape it off. Like yourself I'm not going to worry about getting every single bit of it off. In fairness it seems to have done a good job whatever it is that they used.

  7. #7
    Non-member jamie_clioGTT's Avatar
    Join Date
    Nov 2010
    Location
    Burntwood Staffs
    Posts
    468
    Post Thanks / Like

    Re: Project: Is it all there.

    Regarding the thick gloopy substance... i scraped it all of and cleaned it with white spirits, i have now re sealed it with the hammerite underseal with added waxoyl and i believe that is what the stuff was that was on it, it is bitumen based so a real good underseal but a nightmare if you want to get it off. in hindsight if i knew it was that that was on i would of left it alone.

    Done some more work on the engine bay, started to get a little bit angry with it as nothing seems to line up and both sides are different due to previous repairs etc. looks like 1) the car has had some impact on the front and 2) there has been some sort of repair panel put on the passenger side, its not too bad but far from perfect, how far do you go? i thought about just chopping the front end off to be honest i just dont have the time to do it, and looking back at previous pictures all the panels and lights seemed to line up pretty well. so i had ago at repairing some bits best I can..

    So this whole piece is bent, so i drilled it off, without a spot weld drill so just did the best i could..


    As you can see from the following picture the whole cross piece is bent, so cut some grooves in to help me re shape the metal work, this is a picture after the plate has been removed and straightened and then placed back on to see how far the cross piece is out.


    I have no idea what im doing selfie..


    and then this is how it lined up after a couple of hours messing about.


    once i have welded up the slits i have cut i will reshape the rest just to make it look pretty.

    I then cracked on with cleaning the loose stuff from wheel arches and underneath and started flatting back the engine bay..


    Then i got some underseal on the car and started etch primering the engine bay.


    So i think i am just going to ignore the bad lining up issues, get plenty of high build primer on the bay and just go with it to be honest. Should be picking my repair panels up end of the week and am currently on the look out to buy a decent second hand welder and then the real fun will begin.

  8. #8
    West Midlands Area Rep w35ty's Avatar
    Join Date
    Feb 2009
    Location
    Walsall
    Posts
    1,223
    Post Thanks / Like

    Re: Project: Is it all there.

    Nice little project there fella.. take your time get it right be good to see once all done keep the updates coming..

    Im from walsall area too where abouts are you not sure if iv asked before?? Need any help just give a shout..

  9. #9
    Non-member jamie_clioGTT's Avatar
    Join Date
    Nov 2010
    Location
    Burntwood Staffs
    Posts
    468
    Post Thanks / Like

    Re: Project: Is it all there.

    Thanks mate. will get there one day.

    Not actually from Walsall, i am from Burntwood, near lichfield if you know it?

    Thanks for the offer also

  10. #10
    East Midlands Area Rep Mr Raider's Avatar
    Join Date
    Sep 2008
    Location
    Norwich
    Posts
    2,062
    Post Thanks / Like

    Re: Project: Is it all there.

    Good work, looking forward to the next update

  11. #11
    West Midlands Area Rep w35ty's Avatar
    Join Date
    Feb 2009
    Location
    Walsall
    Posts
    1,223
    Post Thanks / Like

    Re: Project: Is it all there.

    Quote Originally Posted by jamie_clioGTT View Post
    Thanks mate. will get there one day.

    Not actually from Walsall, i am from Burntwood, near lichfield if you know it?

    Thanks for the offer also
    Yeah i know burntwood mate, only about 20mins from
    Me i live bloxwich area if you know that?

  12. #12
    Moderator, Committee Trevhib's Avatar
    Join Date
    Sep 2008
    Location
    Derby
    Posts
    5,829
    Post Thanks / Like

    Re: Project: Is it all there.

    Cracking effort

    Wish I had this confidence and energy when I was young

    That damage, that looks like classic 5GT front end bump. Seen so many over the years.

  13. #13
    Non-member jamie_clioGTT's Avatar
    Join Date
    Nov 2010
    Location
    Burntwood Staffs
    Posts
    468
    Post Thanks / Like

    Re: Project: Is it all there.

    Trev, do you think this bent cross member will be ok with me just repairing it? strong enough i mean?

    Anyway i have done abit on the car. brought a new welder and had a go, come to the conclusion that i really have no idea what i am doing to be honest. really struggled the last few days and made some monumental cock up's.

    My biggest nightmare was getting the outer windscreen panel off my new repair panel that i purchased. almost phoned the scrap man several times and to be honest i have butchered it abit so there will plenty of holes to weld up and metal to straighten when it comes to fitting it.

    Few pictures.. apologies for the quality. using my phone as i have lost my camera.

    New panels to replace my rotten ones.


    Got the windscreen out and took more pictures of the rust.


    New welder from machine mart..


    Refitted the plate and welded up the cuts i made in the cross member.


    Burnt through my shoe/sock and straight on to foot. i wasnt happy..


    Then just started to weld up some holes that re in the bay that wont be being used just to make it look abit more fresh when its done and for some welding practice..


    And then i started removing the windscreen panel..


    Bit stuck at the minute as i need my doors off to carry on, problem is where it is i cant open them to remove them, i have no idea what im going to do with this at the minute.... so i cracked on butchering off the outer from the repair panel i picked up.


    Didnt get any pics of it during as stress levels were high, got some serious fettling and welding to do when i manage to get the other one off.

    That is how i left it tonight. might get a few more hours in tomorrow but loosing interest fast just because of lack of experience of doing this type of thing and i like to try and get things as close to perfect as near dammit and i just don't have the skills to get it perfect. im hoping a combination of bad welding and good linishing will see me right though.

    Cheers.

  14. #14
    Non-member wilton_warrior's Avatar
    Join Date
    Apr 2011
    Posts
    112
    Post Thanks / Like

    Re: Project: Is it all there.

    impressive work you undertaken already. keep up the work. I havnt got as far as yourself and or others who are or have gone so deep into the resto of there 5. looking forward to mine now knowing that the results are worth it. great progression

  15. #15
    Moderator, Committee Trevhib's Avatar
    Join Date
    Sep 2008
    Location
    Derby
    Posts
    5,829
    Post Thanks / Like

    Re: Project: Is it all there.

    Mistakes are an integral part of learning and practice makes perfect. Great journey, most don't even try this stuff so you're already ahead of the game.

    As for that cross member, there's no way I could say from this distance that it's strong enough or indeed as strong as it was originally. What I do know is that they aren't exactly like RSJ's out the factory and in any case, I'm not sure what protection or rigidity they actually provide.

    Bottom line - I wouldn't worry, but then you're not me

  16. #16
    Non-member jamie_clioGTT's Avatar
    Join Date
    Nov 2010
    Location
    Burntwood Staffs
    Posts
    468
    Post Thanks / Like

    Re: Project: Is it all there.

    Thank you for the replies, it certainly helps with motivation!

    Thanks trev, I think I will just leave it as is then.

    Thanks again.

  17. #17
    Non-member
    Join Date
    Apr 2011
    Posts
    1,214
    Post Thanks / Like

    Re: Project: Is it all there.

    Keep up the good work Jamie, I like to tackle most jobs myself and have made a load of mistakes along the way but by the end of it you've learnt something new I wouldn't worry about the cross member, many peeps cut this out to fit a huge intercooler and don't worry about the strength side of things.

  18. #18
    Non-member jamie_clioGTT's Avatar
    Join Date
    Nov 2010
    Location
    Burntwood Staffs
    Posts
    468
    Post Thanks / Like

    Re: Project: Is it all there.

    Hello,

    Been a busy boy today but wont ramble on and will let the pictures do most of the talking.

    Started the day off moving the car so i could get the doors off, what a barrel of laughs that was..


    Windscreen surround off and the remaining lip was linished to make it all nice and flat and ensure no rot..


    Didnt realise there was cable's running down the pillars.. oops.


    Zinc primered eveything that will be unseen.


    And the new tacked in


    Then got the inner arch chopped out..


    Found some more rot on the chasis leg so had to get that chopped out


    And this is pretty much how is left tonight


    Going to crack on tomorrow and hopefully get most of the welding done.

    Cheers.

  19. #19
    Non-member jamie_clioGTT's Avatar
    Join Date
    Nov 2010
    Location
    Burntwood Staffs
    Posts
    468
    Post Thanks / Like

    Re: Project: Is it all there.

    Hi All,

    Done abit more on this last couple of weekends, i reckon i have spent around 50 hours on getting my new surround and inner arch in. its been a nightmare to be honest. its like welding a tin can.

    anyway a few pictures.

    Got the rotten part of the chasis leg welded in.


    Inner arch in and welded ready for grinding back..


    Wing on to make sure everything lined up ok, and to my surprise.. it did.


    Then started to put a skim of filler across every weld just to make sure there are not any gaps in the welds etc, will be sanding the filler right back so it really will be just a small amount.


    Then decided to chop the rot out of the panel underneath the passenger headlight, please excuse the welds, i had an absolute mare doing this because the front cross member was in my way to lay decent welds. had to put two skins in as you can see in the picture. still got to grind this back and make it look prettier.


    Also filled a few more of the holes in the firewall, will be filling all of these in and then re drilling any i need, as i need them as there is far too many and most of them look like somebody has chewed them out with their teeth.


    Next picture may be frowned upon by most...

    I am going to fill all of the lines in the engine bay to make a cleaner look. once again using minimal filler and making sure it is sealed properly. going to get rid of the join on the top of the turrets also.


    And thats about it for now. just got to clean a few welds up get the rest of the holes filled in and then on to the next bit of rot

    Any feedback appreciated,

    Thanks.

  20. #20
    East Midlands Area Rep Mr Raider's Avatar
    Join Date
    Sep 2008
    Location
    Norwich
    Posts
    2,062
    Post Thanks / Like

    Re: Project: Is it all there.

    Excellent work mate, looking more solid already!

  21. #21
    Non-member jamie_clioGTT's Avatar
    Join Date
    Nov 2010
    Location
    Burntwood Staffs
    Posts
    468
    Post Thanks / Like

    Re: Project: Is it all there.

    Thanks mate! its certainly a painful process

  22. #22
    Non-member jamie_clioGTT's Avatar
    Join Date
    Nov 2010
    Location
    Burntwood Staffs
    Posts
    468
    Post Thanks / Like

    Re: Project: Is it all there.

    Hi Guys,

    quick update as to where i am with this if anybody is interested..

    Put a coat of highbuild primer on the bay and spent several hours wet flatting it, then put some seam sealer around the parts needed and put a final coat of primer on ready for paint. will need a wet sand before paint but will keep it like this until im ready for paint..

    It is far from perfect as once again my ambition out weighed my skill 
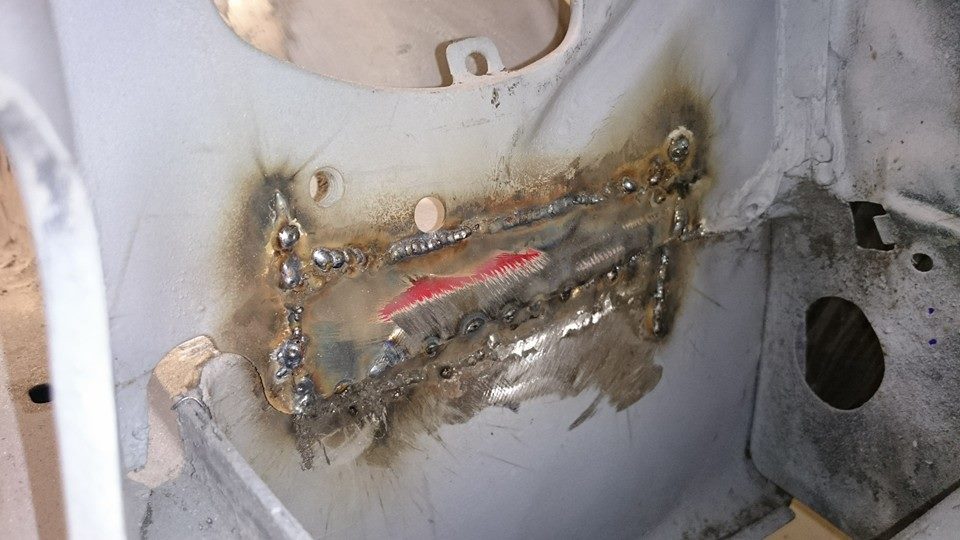
have tried to get a couple of close ups but think i will just live with it to be honest doesn't look that bad i guess..


    The lines on the slam panel is metal work, not primer runs


    Wind screen surround to finish next then concentrate on getting it rolling so i can move it about easier to work on..

    Thanks for looking.

  23. #23
    Moderator, Committee Trevhib's Avatar
    Join Date
    Sep 2008
    Location
    Derby
    Posts
    5,829
    Post Thanks / Like

    Re: Project: Is it all there.

    This is a fantastic effort IMO. Love the pics.

    There are loads of people interested and watching your progress. It's just that not everyone posts

  24. #24
    Non-member jamie_clioGTT's Avatar
    Join Date
    Nov 2010
    Location
    Burntwood Staffs
    Posts
    468
    Post Thanks / Like

    Re: Project: Is it all there.

    Thanks Trev, i appreciate it..

    I didn't mean for it to come across like that

    But yeah, hopefully it will look good painted. doesn't look too bad i just had it looking better in my mind and to be honest i have run out of patience.


  25. #25
    Moderator
    South East Regional Rep
    LiamR's Avatar
    Join Date
    Dec 1998
    Location
    Medway, kent
    Posts
    1,344
    Post Thanks / Like

    Re: Project: Is it all there.

    I love reading this sort of stuff! So keep it updated.

    It looks great so far matey!

  26. #26
    Committee, Moderator Matt Cole's Avatar
    Join Date
    Sep 2008
    Location
    Durham
    Posts
    5,259
    Post Thanks / Like

    Re: Project: Is it all there.

    Awesome effort.

  27. #27
    Non-member jamie_clioGTT's Avatar
    Join Date
    Nov 2010
    Location
    Burntwood Staffs
    Posts
    468
    Post Thanks / Like

    Re: Project: Is it all there.

    Thanks Guys, Appreciated

  28. #28
    Non-member
    Join Date
    Apr 2011
    Posts
    1,214
    Post Thanks / Like

    Re: Project: Is it all there.

    Everyone likes to read about people's projects, but like trev just said not everyone posts. That's what I tell myself when I put an update on here looking good though. I wouldn't leave it in bare primer for too long mind as primer is porous and you may well get rust creeping in.

  29. #29
    Non-member jamie_clioGTT's Avatar
    Join Date
    Nov 2010
    Location
    Burntwood Staffs
    Posts
    468
    Post Thanks / Like

    Re: Project: Is it all there.

    Thanks for the advice, bay will be painted as soon as windscreen surround has been finished off and the paint shop is open, two weeks max im hoping.

  30. #30
    Non-member Matty's Avatar
    Join Date
    Aug 2014
    Location
    Longwick, Bucks
    Posts
    513
    Post Thanks / Like

    Re: Project: Is it all there.

    Looking much better than the first pics!

    It's always good to see whole panels being swapped out instead of patches being welded in here there and everywhere, always seems like a better job to me.

  31. #31
    Non-member jamie_clioGTT's Avatar
    Join Date
    Nov 2010
    Location
    Burntwood Staffs
    Posts
    468
    Post Thanks / Like

    Re: Project: Is it all there.

    Quote Originally Posted by Matty View Post
    Looking much better than the first pics!

    It's always good to see whole panels being swapped out instead of patches being welded in here there and everywhere, always seems like a better job to me.
    you wont like this next update then


    Haven't really done a lot to it just lately.

    re assessed my drivers sill and i am not too comfortable with changing an inner and outer sill just yet. especially as its one of the main structures of the car. so I have welded in three patches and welded in a bottom return lip.along the sill. also welded in a new piece to my boot floor.

    Cut the bit of rusty inner out, made a cardboard template and joined it up to the inner best i could.


    Cut the template out of metal and welded it in.


    Then cleaned up the welds and started to shape the metal i added in. still needs a bit more shaping but will finish it off when i come to get ready for the respray.


    Then cut all of the rot out my boot..


    Now having thought about the next bit, if i was to but my new piece of metal up to the boot floor i couldn't see there being any strength there, plus the boot floor was properly piss ant thin. so i welded it underneath the floor with spot welds, my only problem here is there being a lip on the inside so i will either weld a plate on top or just skim it with filler, undecided yet.

    Underneath part with a return edge welded in


    and then spot welded to the return edge and also seam welded the flat piece of metal in.


    Then just blasted some seam sealer over the welds. i have now wax-oiled it and its barely noticeable so fairly happy with it..


    And then just wax-oiled the front drivers arch, i am reasonably happy with this now so it will be left as this.


    So drivers side is all solid apart from the rear bumper mount which I will be ordering two from somewhere?

    All comments welcome but as I keep saying i am very new to this so my repair standards are not up to the standards of you guys on here but i am doing my best and as far as i am concerned the welds seem penetrated enough and at least the rot is slowly being cut out.

    Passenger side next..

    Cheers.
    Last edited by jamie_clioGTT; 03-01-2015 at 23:41.

  32. #32
    Non-member
    Join Date
    Nov 2014
    Posts
    48
    Post Thanks / Like

    Re: Project: Is it all there.

    Good on you lad
    Fair play for giving it a go
    Looks like youve done a good job too !!

  33. #33
    Moderator, Committee Trevhib's Avatar
    Join Date
    Sep 2008
    Location
    Derby
    Posts
    5,829
    Post Thanks / Like

    Re: Project: Is it all there.

    This is turning into a fantastic save

    Rear bumper mounts - Does Ashy still supply these? I'm surprised we don't have them in the shop.

  34. #34
    Non-member jamie_clioGTT's Avatar
    Join Date
    Nov 2010
    Location
    Burntwood Staffs
    Posts
    468
    Post Thanks / Like

    Re: Project: Is it all there.

    Quote Originally Posted by Trevhib View Post
    This is turning into a fantastic save

    Rear bumper mounts - Does Ashy still supply these? I'm surprised we don't have them in the shop.
    Cheers chaps, im not sure if Ashy still does them? Havent really had a proper look around yet but I'm sure mike or bob will be able to supply these?

    Cheers

  35. #35
    Moderator, Committee Trevhib's Avatar
    Join Date
    Sep 2008
    Location
    Derby
    Posts
    5,829
    Post Thanks / Like

    Re: Project: Is it all there.

    A-ha, here are the ones Mike supplys. It could be that these are the Ashy ones and Mike has the dibs on supplying them, I'm not sure:
    http://www.gt-turbo-spares.co.uk/?page_id=26

  36. #36
    Non-member jamie_clioGTT's Avatar
    Join Date
    Nov 2010
    Location
    Burntwood Staffs
    Posts
    468
    Post Thanks / Like

    Re: Project: Is it all there.

    Quote Originally Posted by Trevhib View Post
    A-ha, here are the ones Mike supplys. It could be that these are the Ashy ones and Mike has the dibs on supplying them, I'm not sure:
    http://www.gt-turbo-spares.co.uk/?page_id=26
    cheers Trev! will get some ordered at some point, for 12.50 a side its not worth trying to fabricate them.

  37. #37
    Non-member
    Join Date
    Sep 2008
    Location
    Durham
    Posts
    351
    Post Thanks / Like

    Re: Project: Is it all there.

    Good skills.
    Doesn't look like it needed a full inner or outer sill either!

  38. #38
    Non-member
    Join Date
    Jan 2015
    Posts
    7
    Post Thanks / Like

    Re: Project: Is it all there.

    New poster! (less than 10 posts)

    looking good jamie. fair play to throwing you self in the deep end lol. I'm basically going to be in the same circumstances as you self. just need to get my hands on a good welder. keep up the good work

  39. #39
    Non-member jamie_clioGTT's Avatar
    Join Date
    Nov 2010
    Location
    Burntwood Staffs
    Posts
    468
    Post Thanks / Like

    Re: Project: Is it all there.

    Quote Originally Posted by V Man View Post
    Good skills.
    Doesn't look like it needed a full inner or outer sill either!
    Just about got away without a full replacement although im not sure i will be so lucky with the passengers side, will re assess when im in the garage next.

    sillwood - I got my welder from machine mart, they have VAT free days occasionally so that will help you, although if your going to fork out upwards of £250 - £300 on a welder its worth getting a turbo model as they have a longer duty cycle. wont make a difference when welding on the car but if you ever want it for welding other stuff it will be better

  40. #40
    Non-member jamie_clioGTT's Avatar
    Join Date
    Nov 2010
    Location
    Burntwood Staffs
    Posts
    468
    Post Thanks / Like

    Re: Project: Is it all there.

    did some more today.

    Reassesed my passengers sill and pretty confident i will get away with three patches. im happy to report the inner is actually in quite good condition, just bent so will straighten that out with mc hammer.

    I would also like to apologise for the bad pictures as im now on the passenger side and don't have much room at all.

    Started with the rear quater.


    Started to grind it back to find solid metal work to chop and weld to and, well. it took a while due to a 5-6 mm thick layer of filler across pretty much the whole rear quarter


    so started removing all of the filler and chopped the rot out. Also chopped one of the patches out the sill.

    Im abit confused as to why it has a full layer of filler across it, the main panel seems in good condition with just a few dings in it so it will all go back to bare metal and only fillered in the dings if i can't get them out with a dolly.


    Small health and safety issue when cleaning the filler off the panel.


    New metal spotted in


    I have now sealed the patches with weld and started to shape them up.


    Boot floor rot


    Chopped out


    Also my door shut is starting to rot away, so i cleaned this up at first and then erm.. just filled it with weld


    Then because of the time i couldn't carry on grinding, welding etc so had a look at the wiring. and well, wow. i have no idea how this car has never set on fire. some of the wiring is just plain right dangerous.


    so every single wire has been removed and the plan is to replace every single wire but not copying the original loom, i will make a custom loom so the relay for the aquamist and for the headlights etc are all in the car. so by the end of it there will be no relays in the engine bay.

    I have not decided yet whether i will make a custom fuse carrier/ relay board or if i will modify the original one. im waiting on my dad for some cable and connections before i make a start on it.

    Cheers.

  41. #41
    Moderator
    South East Regional Rep
    LiamR's Avatar
    Join Date
    Dec 1998
    Location
    Medway, kent
    Posts
    1,344
    Post Thanks / Like

    Re: Project: Is it all there.

    Looks good mate. I enjoy looking at other peoples restorations.

    Keep the pics and progress coming.

  42. #42
    Non-member jamie_clioGTT's Avatar
    Join Date
    Nov 2010
    Location
    Burntwood Staffs
    Posts
    468
    Post Thanks / Like

    Re: Project: Is it all there.

    Hello.

    Boring updates i am afraid. haven't barely touched the car for a while due to work commitments.

    Mainly been collecting parts. Although it no longer has any rotten holes in, few little patches on the floor pan have been done and the boot floor has been done since last update. only rust left is the rear bumper panels but they got delivered today so should be able to get them on next weekend.

    I have also made a start on the wiring, and when i say start i mean i have reterminated two AEI plugs

    pictures..

    Sills welded up.


    Sound deadening already removed apart from the piece across the exhaust tunnel


    New oil cooler, replica badges and brake lines.


    Fairly decent floor pan..


    New boost guage to go with my wideband


    repair panels to mark the last of the welding


    And the begining of the wiring.. not the most exciting of pictures i apologise


    TDC


    Cleaned the plugs


    I know people harp on about tinning the ends when soldering but personnaly.. i think its nonsense, it thickens the surface area so looks messy when heatshrinked and its hard to get even penetration in my experience..


    I think when its in the car i will be chopping this in half and putting bullet connectors on so i can swap the wires around.

    And lastly.. my fake Tial wastegate


    Cheers

  43. #43
    Non-member Scoobykilla's Avatar
    Join Date
    Dec 2014
    Location
    Western Australia
    Posts
    78
    Post Thanks / Like

    Re: Project: Is it all there.

    Wow just read all this what a fantastic effort and still going when so many would of give up!!

    Good on ya for saving it

  44. #44
    Non-member jamie_clioGTT's Avatar
    Join Date
    Nov 2010
    Location
    Burntwood Staffs
    Posts
    468
    Post Thanks / Like

    Re: Project: Is it all there.


    Just a wet sand to go when the lacquer has fully hardened and then i can start bolting bits too it... after several thousands of hours cleaning the parts first!

  45. #45
    Ireland Area Rep robx1r's Avatar
    Join Date
    Sep 2009
    Location
    meath
    Posts
    433
    Post Thanks / Like

    Re: Project: Is it all there.

    looking good man!

  46. #46
    East Midlands Area Rep Mr Raider's Avatar
    Join Date
    Sep 2008
    Location
    Norwich
    Posts
    2,062
    Post Thanks / Like

    Re: Project: Is it all there.

    Great work, this has come along way since you collected it!

  47. #47
    Moderator, Committee Trevhib's Avatar
    Join Date
    Sep 2008
    Location
    Derby
    Posts
    5,829
    Post Thanks / Like

    Re: Project: Is it all there.

    Wow. Looks really fresh now!

  48. #48
    Non-member jamie_clioGTT's Avatar
    Join Date
    Nov 2010
    Location
    Burntwood Staffs
    Posts
    468
    Post Thanks / Like

    Re: Project: Is it all there.

    Hello..

    Had a week off work this week with my main aim being to get this on its wheels!

    So a trip to CGB to get some parts and friday night all come good..

    Was going to send the coilies off for refurb, but all the seals and struts look pretty mint so didn't bother. just wire wheeled them and come up rather good, will give them another going over when i get a new wire wheel. Changed the top strut bearings for new and my mate has give me some poly donuts so need to get the coilies back off and change them out..


    Stripped all this little lot down and painted satin black and fitted..


    Stripped these down, popped the pistons out to check condition and they were in great condition, even all the seals are in good condition..


    and wallah..


    So it has had new discs and pads all round, poly bushed anti roll bar, and soon to be top mounts. i have done a refurb of the steering rack with the kit that CGB do. new wheel bearings. next on the list is to fit the new handbrake cables and the rear brakes (got to get a rubber boot for one as it is perished) then fit new brake lines and then fit the engine..

    fingers crossed my next update will be the engine in.. not going to rebuild it. just going to paint it up, fit it and abuse it and then maybe a rebuild over next winter.

    cheers

  49. #49
    Non-member
    Join Date
    Feb 2015
    Posts
    38
    Post Thanks / Like

    Re: Project: Is it all there.

    Mega work mate my car needs a similar amount of work but I'm at the very start, I've had it about a month

    I'm from Burntwood too but moved to Bearwood in brum a few years back. I still work there though on the bins, I bet you know someone who knows me.

    Keep up the good work our kid!

  50. #50
    Non-member jamie_clioGTT's Avatar
    Join Date
    Nov 2010
    Location
    Burntwood Staffs
    Posts
    468
    Post Thanks / Like

    Re: Project: Is it all there.

    sound mate, all good fun. do you know a Darren instone or something like that, works on the bins..?

Posting Permissions

  • You may not post new threads
  • You may not post replies
  • You may not post attachments
  • You may not edit your posts
  •