Woz, how did you take that under turret pic. Your arms must be hugely long


Woz, how did you take that under turret pic. Your arms must be hugely long

There's a few on OzRenaultSport too. A tungy grey one, the Red one from Brizzy and one or two others.Originally Posted by Scoobykilla

Last edited by Woznaldo; 15-12-2014 at 10:03.
Well I am quite tall (6' 2"), but I don't think it's that hard to reach?.... ...Saying that, I do find it hard to buy off the peg suits to fit my arms....
Go go gadget
The manufacture of the Top Mount/Camber Plates has suggested that I bore the Leda Spring Top Hats to the same 22mm as the Piston Rod, thereby making them a 'floating' assembly. This will buy me some more thread, but I'm not sure if it will be enough.
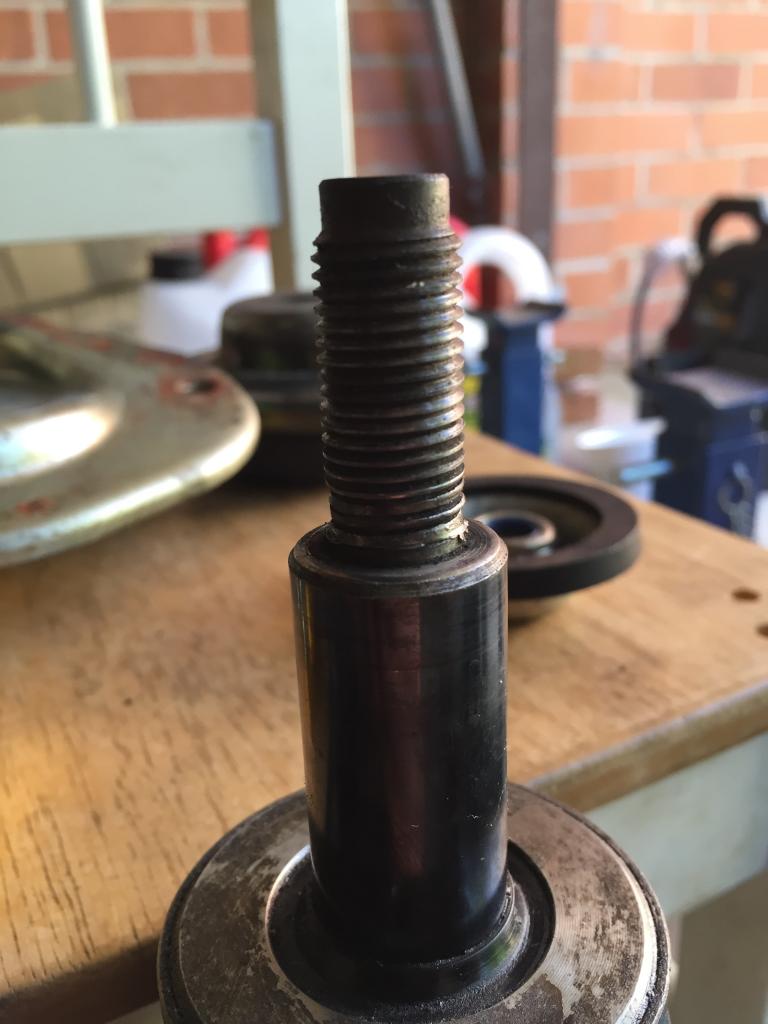
Here's a pic showing the setup with the unmodified Top Hat.
I'll try the Bearing Housing with no Top Mount Fitted and see how much thread I actually have and go from there.
Saying that, I've just previewed the above picture and it looks like the Shouldered Sleeve may be smaller than 22mm?.....
Woz
Looks like it is. Probably about 21.85mm

Yeah my red one is the red one form Brissy
That would explain it!

There's a guy from The Netherlands who emmigrated to Australia a few years back, who took his ebs and gtt with evo bodykit
As suspected, the available thread is still not long enough with just the bearing and sleeves (no top hat).
So the two solutions are to abandon these top mounts for ones with a larger bearing, or machine the Leda Piston Rods to free up some thread. 15mm is probably what's required and with the Piston Rods removed, I should be able to get any reputable machine shop to carry out the work.
When I spoke to Roger at Leda, he said that he would go for the larger bearing option as a longer threaded portion could be weaker? I think Roger's logic is sound, but if I ensure the machining includes some fillets to reduce stress points, I think this weakness could be largely mitigated? Time will tell.....
Last edited by Woznaldo; 28-12-2014 at 23:16.
After the recent temperature creeping I decided to upgrade the cooling system. For the moment I'm going with an Oil Cooler with remote Oil Filter. I got the kit from Majesty on eBay. I'm pretty happy with the quality, but won't know for sure until it's up and running with some pressure in the system.
I've located the Cooler and Remote Filter Housing, but may need to get a few different AN10 fittings to get the best angles on the hoses. Here's a few pics:
Here"s the remote filter housing, just below the left front indicator. Ignore the rusty cross beam, I'm going to clean that all up.
The kit comes with 4 x 90 degree AN10 and 4 x straight AN10 for the six ends, but I'm going to get a 150 degree and a 45 degree to make it neater behind the cross beam.
Nice setup you will have to let us know if affects the temps any??
I am hoping mine copes with the heat over here although I think it should....

New poster! (less than 10 posts)
G'day Woz. That remote oil filter housing is a great idea. Does that mean you can blank the current oil filter position off, making oil filter changes a piece of piss, cos currently they are a nightmare!

The remote setup will blank off the current filter position, only issue would be would the oil cooler will be running inline? So cant control the oil temperature
G'Day Tambo and Scoobykilla,
I've got some other bits I'm going to change on the car, so won't know how well it helps the temperatures, but I'd like to take advantage of the summer temps so I can give it a real test!
The standard setup uses an oil route as follows:
1. Sump
2. Pump
3. Sandwich Plate
4. Cooler
5. Sandwich Plate
6. Filter
7. Engine
My new setup will be as follows:
1. Sump
2. Pump
3. Takeoff Plate (in place of Sandwich Plate)
4. Cooler
5. Filter
6. Takeoff Plate
7. Engine
The only real difference is that the OE Sandwich Plate has a small bleed hole that allows a small amount of oil to constantly bypass the cooler, but not the filter. I won't have any bypass so I my oil could take a little bit longer to get up to temp. I did look at making a similar hole with the new setup, but it would mean bypassing both the cooler and the filter and that's not a good thing!
I have looked at different types of Thermostat, but none will really work with my application. I will fit an Oil Temp Gauge to monitor temps and a mech Oil Pressure Gauge too. This way I'll be able to get a better indication of what's actually happening.
Once I'm all up and running again, I'll let everyone know how works in the real world.
Oh, I forgot to say, YES filter changes will be a breeze now!
Yeah will make oil changes easy lol
Be interesting to see how it goes if its worth the extra effort...
I forgot to mention earlier that when I pulled the LH Strut off, it felt like it had lost all damping! I obviously continued to do my Top Mount/Camber Plate assessments as I was just checking dimensions.
Anyway, now that I've had more time, I pulled both the Struts and took then to my old work workshop to use their big vice as nothing in my garage was large enough to hold the Struts for the release torque!
I also noticed the RH Strut was extremely stiff when it came off, so I was very interested to know what was going on. On the LH Strut I was expecting to find some dirt under the shims holding them open, but even then wasn't expecting that to account for the total lack of damping on the LH Strut.
With the Struts in the vice and both Gland Nuts cracked I started to pull them apart to assess the damage. It was immediately apparent what the issue was as soon as I lifted out the Piston Tubes.
LH Piston Tube - This had ruptured allowing the hydraulic circuit to be compromised!
RH Piston Tube - This had also ruptured, but in a much more dramatic way. The Piston has tried to escape from the Piston Tube!!!!
Despite the damage, they should still be rebuildable and the most important parts are completely untouched.
Good effort!Lol. Blimey.

Woz - can you swap the top hat on the damper for a shouldered nut? It's like that on the Clio kits.
I did this on the Twingo https://www.rtoc.org/boards/showthrea...per#post162965
Andy
Andy, even with no Top Hat fitted at all I still don't have the grip length. If the bearings in the Camber Plate were bigger (had a bigger ID), I would be able to use a sleeved nut and have no problem at all.
The company that supplied the Camber Plate also do some Top Hats for 2.5" ID Springs that have a needle roller bearing that actually sits against the Camber Plate Bearing Housing thus taking a lot of stress off the bearing itself. This Top Hat is 'floating' on the Piston Rod too.
So I dropped the Front Subframe a few days ago so I could complete a few jobs on the Engine, Engine Bay and Front Suspension.
Here's the front end of the car being lifted. I did it slowly with frequent checks to make sure nothing was snagging and all was good except for the Brake Servo to Manifold pipe!Found it on the second check and no damage done.
This is the height I needed to wheel the Subframe Assy. I didn't have much room, so had to wheel it out sideways.
Looks like some old school drag racer with no wheelie bar!
Here's the Front Subframe with Engine/Gearbox complete. I bought a dolly platform from a local auto factor for AU$32 (GBP17) that allows me to wheel the assembly around the garage.
Things to do on the Engine are Timing Chain and Tensioner, clean up the block and maybe give it some colour. I'm also going to pull the sump and replace the crank seals to cure some leaks. I wondering if I should refresh the Oil Pump while I've got the Sump off?
I've already split the Engine from the Gearbox and mounted it on my newly acquired Engine Stand. I had to remove the Clutch to fit the Engine to the stand. All of the clutch bolts came out apart from one that required me to hammer in a 1/4" Hex Drive socket as someone had already rounded off the inside quite nicely.
I'll let you know what I find as I pull the Engine apart.

Cool picture doing a wheelie what's the two square boxes on crossmember extra bumper blocks?
Yeah, I formed some 3mm Aluminium sheet to provide some extra support for the Front Bumper as I didn't like the gap that was under the Front Grill.
Yes I see now as you have a skeete front bumper my mrs car used to have a skeete front bumper and always had a gap under the grill good idea regards rob
If you're going to do the oil pump, make sure you get the right GTT replacement. Not one from one of the other R5 models
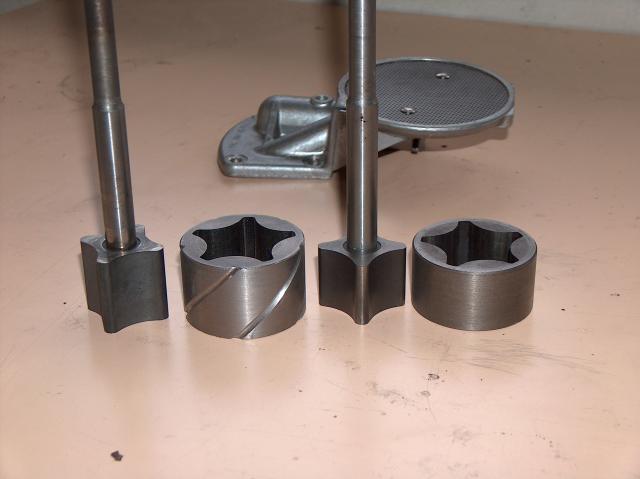
Yeah, I fell for that trap before I left UK and still have it on the shelf! easy to tell them apart too. All other Cleon engined 5s used a spur gear type pump and the GTT uses a vein and rotor type pump.
I did a bit of research and found a higher capacity pump that's used on some older Renaults (Gordinis etc) in France, but couldn't make contact with anyone. Is it required? Probably not, but always good to have the extra capacity!
Here's a pic of the larger Vein and Rotor next to the GTT original.
Here's the link to where I found it. I think someone on here actually pointed me in the right direction, but can't remember who. Ian S maybe?
http://keops-racing.skyrock.com/17.html
Brilliant.
Started pulling the Engine apart today. Just started with the Sump and Timing Chain Cover. I was expecting to find some damage/rubbing as I occasionally got a sound that sounded like something was loose, but it all looks tip top.
I'm going to replace the Timing Chain and Tensioner anyway as I have them.
I also pulled the Oil Pump off and while it all felt quite good with no excessive play, while I pulled it apart there was some scoring in the housing that I think will mean a replacement is on the cards.
There's also some abrasion on the Vein and Rotor pieces.
I did pull a sliver of metal out of the Oil Pump suction strainer that I'm a little concerned about, so I might just go with a full rebuild and be done with it!
More as it happens!
I absolutely love this car!
Thank you kind Sir.
Ok, pulled some more bits of the Engine, but before I got too far I decided to re-check the Alliance MPI Manifold. In one of my earlier posts (would have been a while back), I highlighted where the lower half of the Alliance MPI Manifold was contacting the Exhaust Manifold. In the original Californian 1.4L Alliances the Inlet and Exhaust Manifolds are bolted together for heat transfer purposes. I will not be needing that, so I removed the forward two mating lugs.
This has now allowed the Alliance MPI Manifold to sit flush against the Cylinder Head inlet port face. The angle that the Throttle Body sits at now, is much more favourable! Result!
I pulled the Down Pipe off the back of the Turbo and noticed that the Turbine Housing is cracked at the By-pass Button opening. I'm sure it would be ok for a while, but I do have another Turbo. It's only a T2 with a slightly larger Compressor Wheel. I might whack it up to 18 psi and see what happens.....
The Pistons look like they're in good knick too. Despite some concerns about my fuelling, it would appear to have been a little rich if anything
I wasn't happy with the end fitting options provided in my Oil Cooler Kit. Not that they weren't good, just not great for my setup. To that end I ordered a 150 degree and a 45 degree end fitting to make for a far more pleasing solution to the way I will route my hoses.
I wanted to drop below with one hose and up and over with the other from the Remote Filter Housing. No hoses fitted yet, but you get the idea.
I'd love to change the Cam while the engine is out, but I don't think that my budget can stretch that far
I did manage to pick up most of the bolts I need for AU$60, which is a shit load cheaper than buying Champion packs! I couldn't get any 10.9 or 12.9 bolts, apart from the Clutch Cap Screws.
I guess I'll just to get these bolts through Mike or Bob. They're the Flywheel bolts, the Crank Pully Bolts and obviously the Head Bolts.
Great result!
The crack in the turbo housing is super common, that looks fine to me.

[QUOTE=Woznaldo;390063]Started pulling the Engine apart today. Just started with the Sump and Timing Chain Cover. I was expecting to find some damage/rubbing as I occasionally got a sound that sounded like something was loose, but it all looks tip top.
Hi Woz.
I may be wrong here but my C1J and a friends C1J both make a rattle on startup.
I personally put this down to the chain tensioner working on oil pressure so takes a few seconds to put full tension on the chain.
As i have said i may be totally wrong here hopefully somebody else can give an input?
Looking great though, really impressive work going on
There's a good way to test that:
Run the over-boost wires to the cabin, bridge them (with a switch if necessary), crank the car over until the oil pressure comes up, hit the switch, car fires, listen for rattles. If it doesn't, it's oil pressure as suggested and/or maybe a bit of piston slap.
If it does still rattle then it's not oil pressure.
Trev top tip
Nice one, i too will bare this in mind.
I like that test.
Hide that switch somewhere clever and it allows you to get pressure up every time before starting and doubles as a fantastic immobiliser. Ahem. I did this to all three of my GTTs, can't recommend it enough.
Mine wasn't a start up issue or just when cold. It was intermittent which was making it hard to track down. I was thinking that the Tensioner may have been sticking? The engine just seemed a bit noisy and it was a metallic type noise.
I'll conduct the rebuild and see if anything turns up.
I don't think my oil pressure was as high as it should have been, but we all know how accurate the OE gauges are?.....
My Spacer Plates for the Camber Plates/Top Mounts arrived in the post today. When the machinist was making them he said that there may have been a problem with the eDrawing that I supplied as two of the three attachment slot holes had 'keyholed' slightly. As they are just spacer plates I was happy to take them.
Here's a couple of pics with the Spacer Plates sitting on top.
Obviously the main strut nut will still be proud of the SPacer Plate, but this will be in the region of the existing Strut Tower hole, so should be fine. I might have a go at getting them mounted today if time permits.
I also pulled the Cam Followers and they look pretty good too. No.1 looks like it has some minor marks on it's face, but nothing excessive. The rest just have the normal side discolouration wear.
I'll pull the Cam next....
Enjoying your updatescamber plates look amazing
Thanks Nad.
I finally committed to drilling the Strut Towers for the new Camber Plates after measuring and adjusting about 40 times! I really happy with the result.
RHS First hole!!!!!
That was the hardest part as once I had that done I could get a bolt through and mark the other holes. LHS Camber Plate bolted up.
Here's the Camber Plate bolted up complete with Bearing Housing and new Spacer Plates. The first pic shows max outboard adjustment (remove negative camber or add positive camber). I've put the small 'red cross' where the top of the Strut would be at this max setting.
This pic shows the other end of the adjustment range, although this will probably never be used!
this pic shows where the std Ph2 Top Mount would place the top of the Strut, although only along the Camber axis. There's a fair bit of extra Caster.
So what does this all mean? Well at the moment, when I reassemble the suspension I will have the Camber plates at the OE Camber position. As mentioned above, this will give me some extra Caster, which is always useful. The real advantage will come to the fore when I go to my 172 based Widetrack setup. With the 172 Wishbones pushing the front wheels outboard by about 50mm per side, these Camber plates will allow me to remove any excessive Neg Camber.
Obviously, what I do with the bodywork is another question........
I've got a total range of movement for Camber of 53mm, but the OE position eats about 10mm of that, so remaining adjustment is 43mm. What that means in degrees of Neg Camber I haven't worked out yet.
I suppose I can't have it all my own way.It would appear that I need to get my Crank cleaned up a bit. The No.5 Main Journal is scored around the centre. The rest don't look too bad, but I have yet to measure for oval etc.
What do you guys think about Knife Edging the Crank along with a complete rotating assy balance? I've seen quite a few guys in France go down this route, especially those using their cars in local rally.
UPDATE. (a small one).
Leda have again gone above and beyond with advice and customer service. New parts have arrived today (less of a rush for me this time round) and look the business as usual.
This time I had the Piston Rods made a little longer as I think it will give the Struts some extra lateral stability and I can afford to lose a little bump travel as there isn't much bump travel anyway. I also had the threaded portion made a bit longer to accommodate the new Camber Plates as there wasn't enough to get a nut on! There is now more than enough thread and even a quick trial fit to prove the point.
I know I wont be able to get the full width of camber adjustment with the extra thread sticking up, but that's not required just yet so I wont need to modify the Strut Tower anymore at the moment.

Liking your style Ollie! I have my sights set on a 172 widetrack conversion, so that was my driving motivation. If I was just doing more caster on a std setup, I may have gone a different route.
The bottom line is that I won't really know until the car is back on its wheels.
I was going to do the same as you and redrill the strut tower to suit the mounts I got, but because they were the only ones I could find with the right size bearing the bolt spacing wouldn't work so I had the plates CAD designed off ph1 mounts and laser cut.
I'm running a valver wide track an he plates I had done should work with ph2 suspension too, although I need a test mule. In theory they should work with 172 track too.
The 2 OE position mounting holes could be redrilled to give abit more castor too if need be
The 172 setup is a fair bit wider than the Valver. The Williams Clio is 1402mm, while the 172 is 1430mm.
Posting Permissions

 Reply With Quote